Lab 1 - Social Media Layouts
This lab will help you get familiar with the various MAUI layouts and controls.
- 📝 Worth: 2%
- 📅 Due: Friday Feb 9, 2023 @End of class
- 🕑 Late submissions: 3 days maximum. 10% penalty per day.
- 📥 Submission: In class
Objectives
- Create the UI skeleton for a social media app
- Use a Grid Layout
- Use a Vertical and Horizontal Stack Layout
- Use the Absolute Layout
Create a MAUI Project
- Create a .NET MAUI Project
- Name: Lab1
- ⚠️ IMPORTANT USE .NET 7
Target platform
For this lab we will be testing the app on two different form factors:
- Android Emulator: Pixel 5 - API 34
- Windows Machine
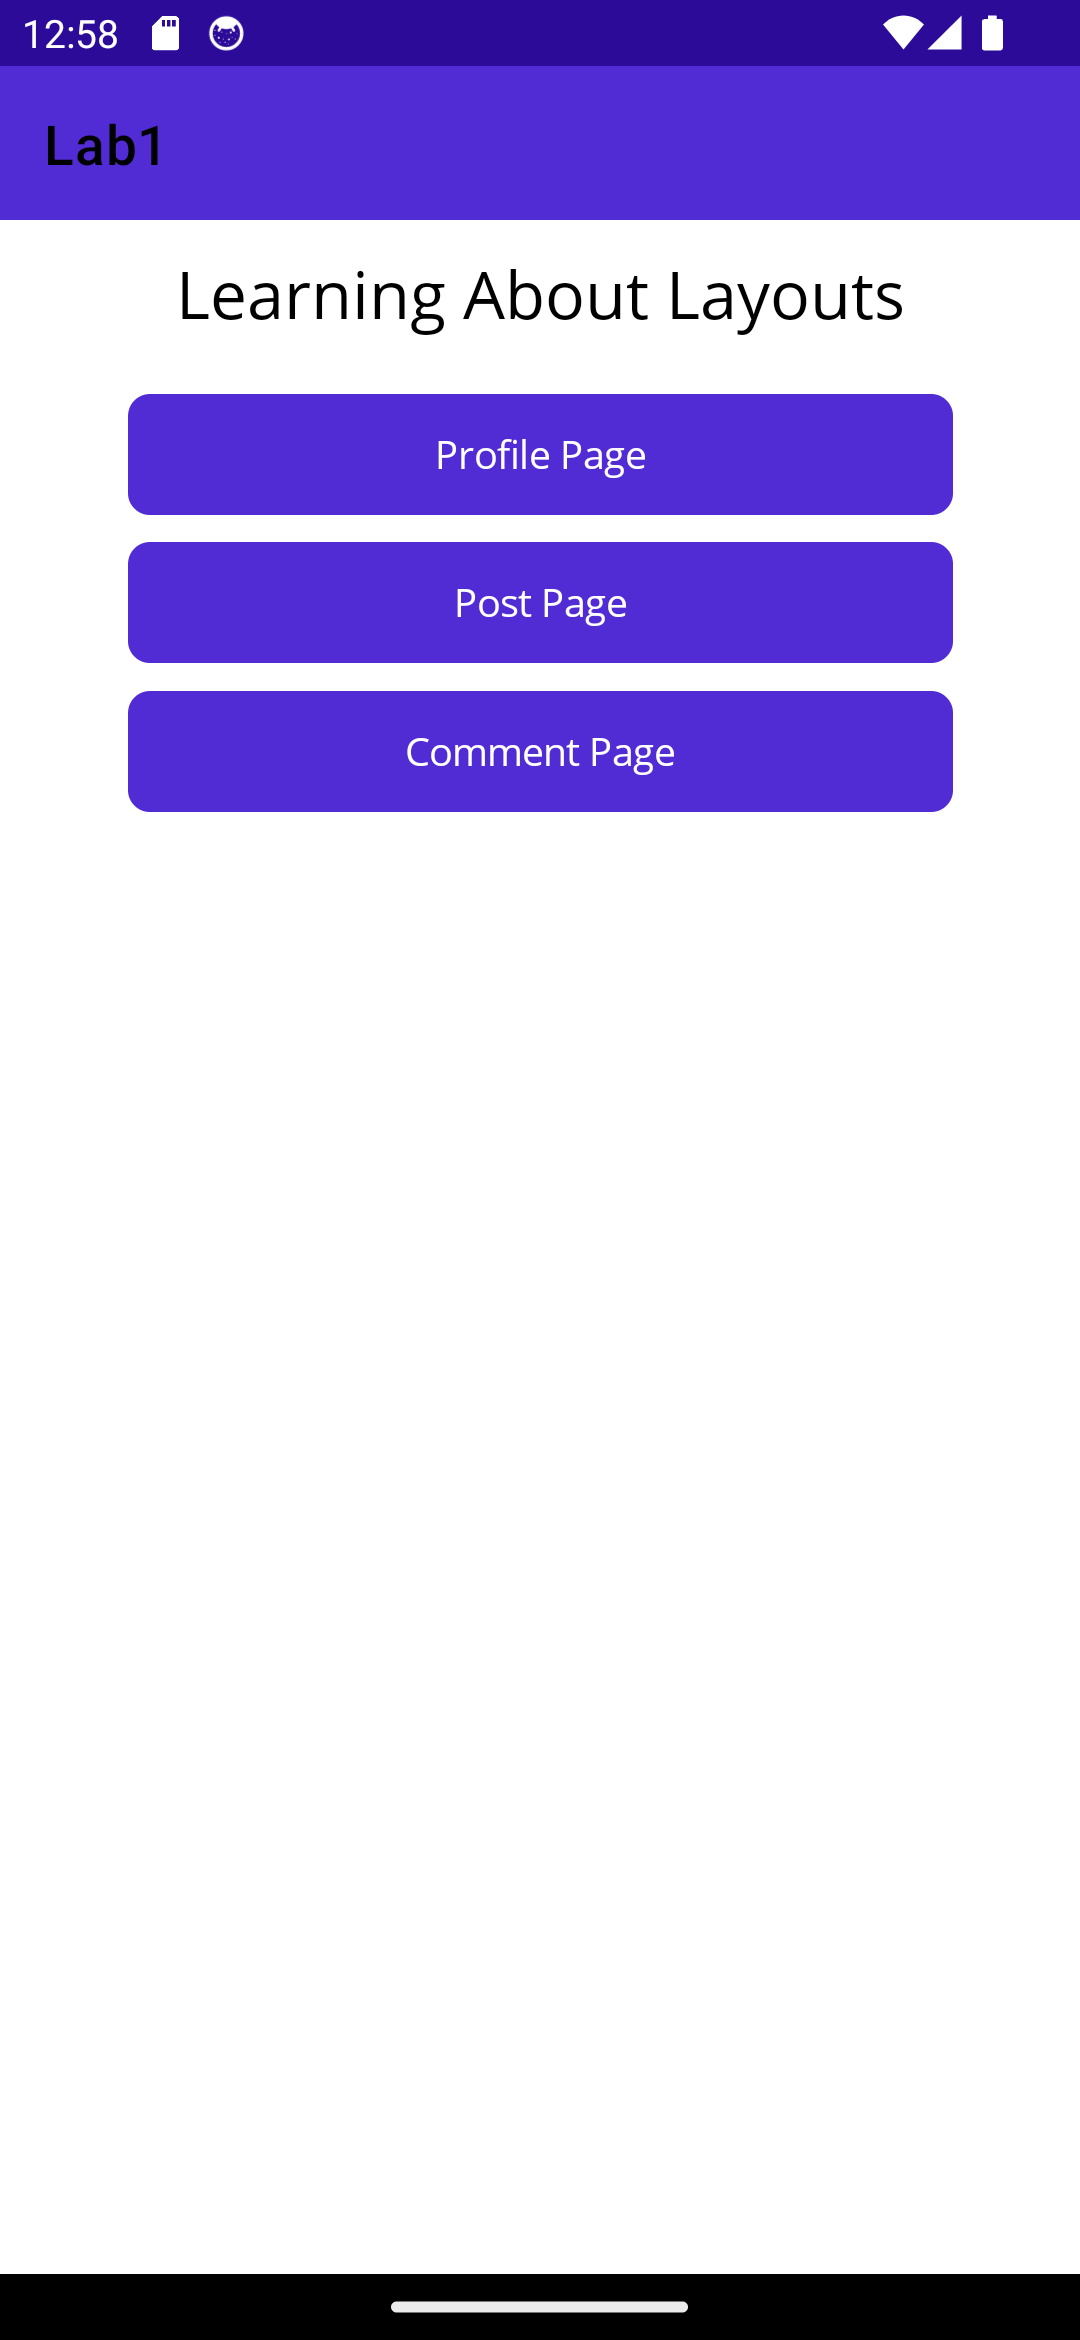
Modify the Main Page
-
Modify the main page to include:
- A
Label:Text="Learning About Layouts",FontSize="Title". Make sure the Label is centered horizontally. - A
button:Text="Profile Page",Clicked(create a new event handler) - A
button:Text="Post Page",Clicked(create a new event handler) - A
button:Text="Comment Page",Clicked(create a new event handler)
- A
-
Rename your event handlers so that they follow the standard Btn_ButtonName_Clicked
App Navigation
- The app consists of three main pages:
- Profile Page
- Post Page
- Comment Page
- We will use the basic stack navigation we have used so far in this course
Create a folder called Views. Add newly created pages in this folder.
Modify the Profile Page
-
Warning! Make sure to use .NET 7 because Microsoft
-
Download the following sample images and place them into your
Resources > Imagesfolder -
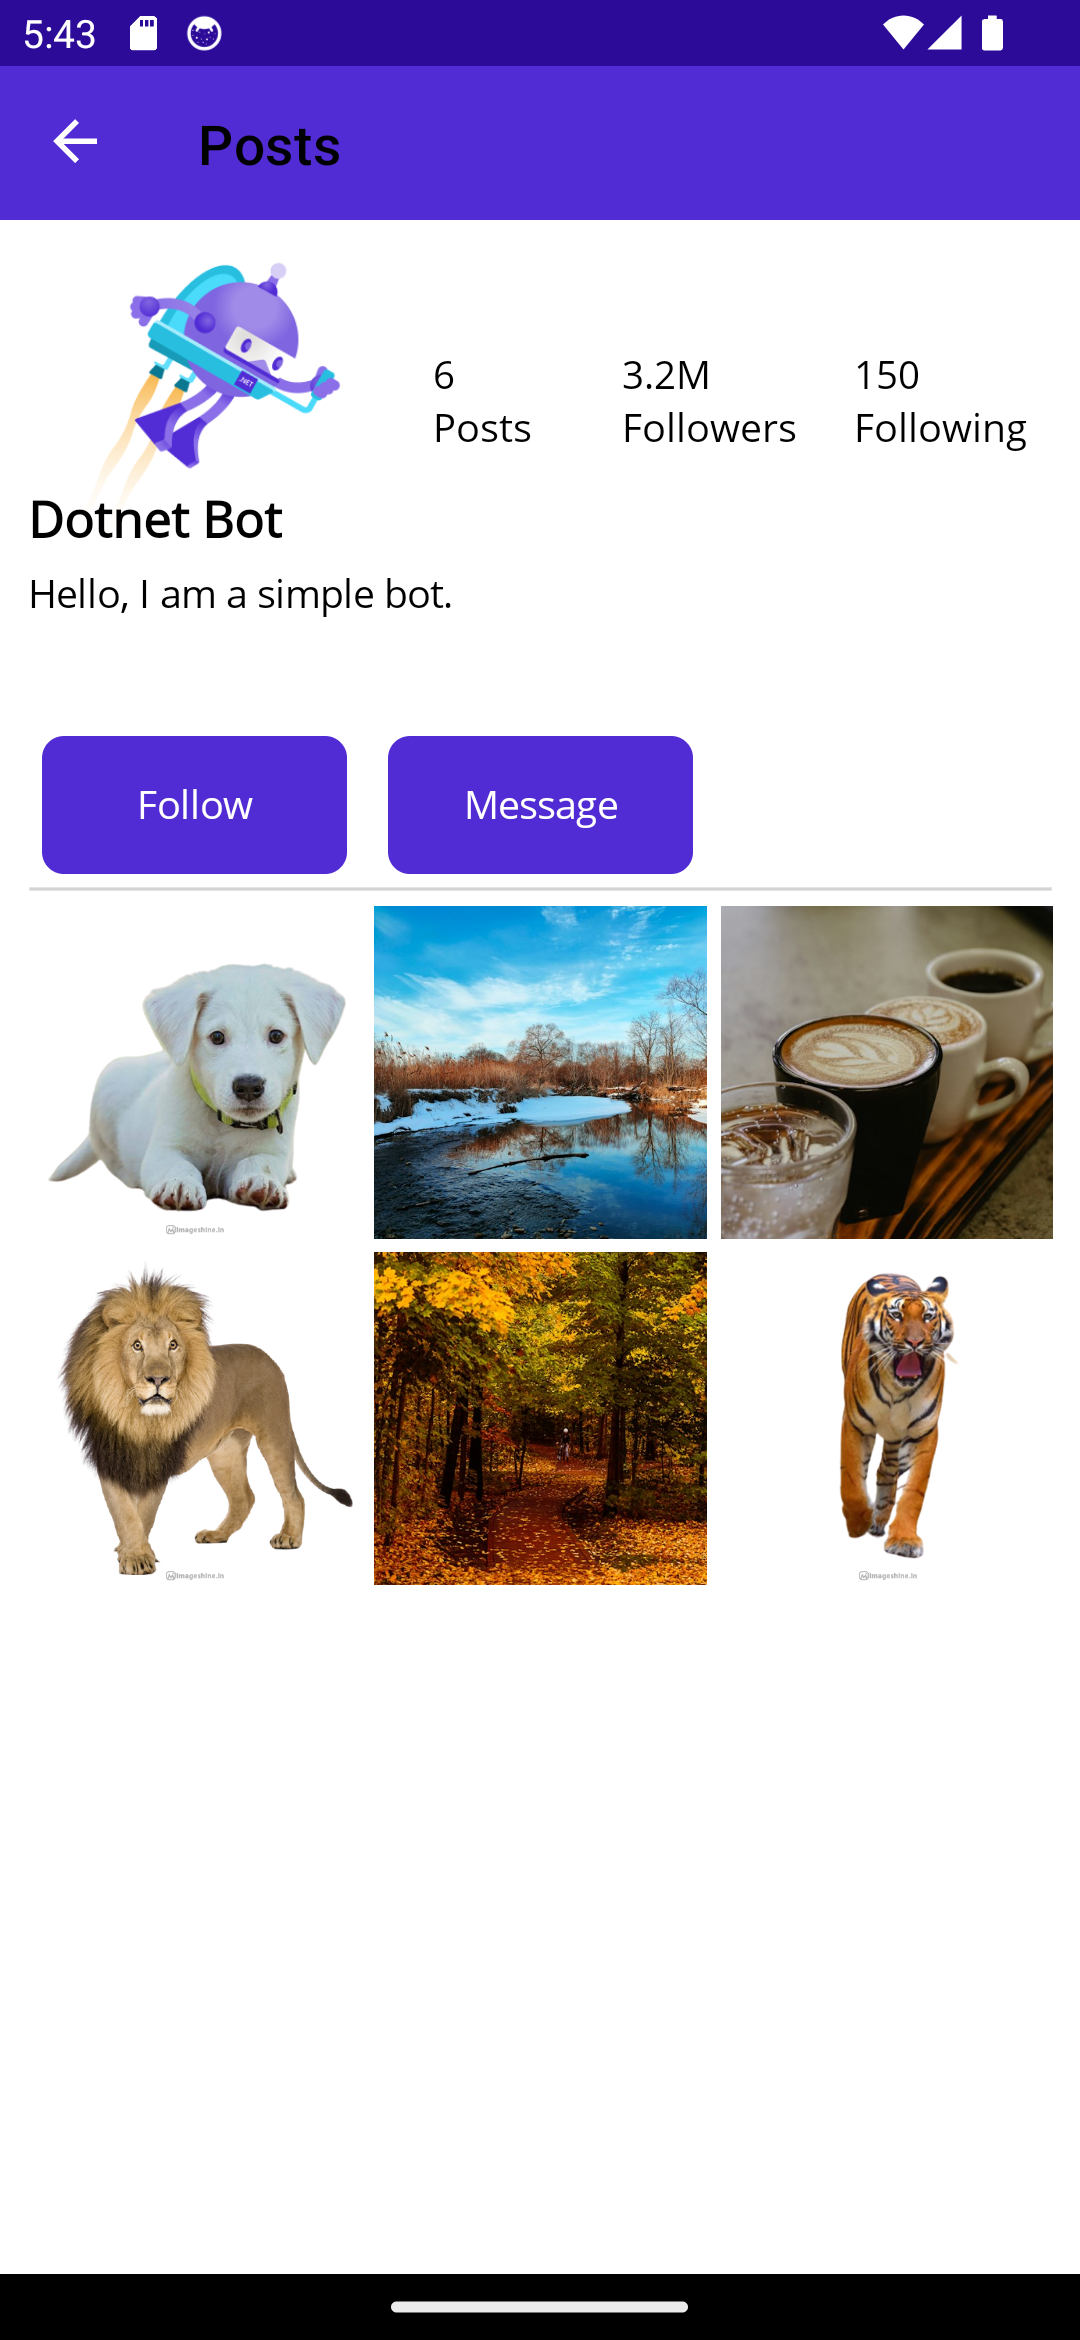
Modify the default
ProfilePage.xamlto include the following:- Remove the default
VerticalStackLayoutand replace it with aGrid - The
Gridmust have the following specs:- Have as parent the
ScrollView - Columns: 3, adaptable to the screen size
- Rows : 10, adaptable to the screen size
- The first row must have a height that is 2 x bigger than all the other rows.
Padding: 10RowSpacing: 5ColumnSpacing: 5
- Have as parent the
- Remove the default
-
Add the following items to the following positions (Row,Column):
- (0,0)
Image:Source= “dotnet_bot_jetpack.png”MaximumHeightRequest=”300”
- (0,0)
Label:Text= “Dotnet Bot”FontSize=”Medium”FontAttributes=”Bold”VerticalTextAlignment=”End”
- (0,1)
Grid:- 3 columns x 1 row with three labels
- (0,0): “6 Posts”
- (0,1): “3.2M Followers”
- (0,2): “150 Following”
Hint: Use
to end a line.
- 3 columns x 1 row with three labels
- (1,0)
LabelText=”I am a simple bot trying to live my dreams.”Grid.ColumnSpan=3
- (2,0)
Button:Text=”Follow”MaximumHeightRequest=”60”
- (2,1)
Button :Text=”Message”MaximumHeightRequest=”60”
- (3,0)
BorderGrid.ColumnSpan=”3”Stroke=”LightGray”MaximumHeightRequest=”3”
- (4,0) to (5,2)
ImageSource: use the sample images to populate the mosaicAspect=”AspectFill”
This is what your layout should look like
- (0,0)

Modify the Post Page
The post page contains all the details of a social media post. To keep it simple, we will only display 1 post and 1 comment:

This page should be composed of a main VerticalStackLayout centered on its parent and separating each child by 5 pixels. It will contain the following information:
- Information about the owner
- Post image
- Number of likes
- Like, Comment and share buttons
- Comments section
Post Owner
The header of the post contains the information about the owner of the post. It is made up of a simple HorizontalStackLayout containing the following elements:
Image:Source= “dotnet_bot_jetpack.png”WidthRequest=50
Label:Text= “DotNet Bot”FontSize=”Medium”FontAttribute=”Bold”
Post Content: Image and likes
This area is where the image should be added in the main VerticalStackLayout:
Image:Source=”fall.png” (or any other sample photos)Aspect=”AspectFill”
Label:x:Name=”LikesLabel”Text=”0 like”
Border:BackgroundColor= “LightGray”HeightRequest=”3”
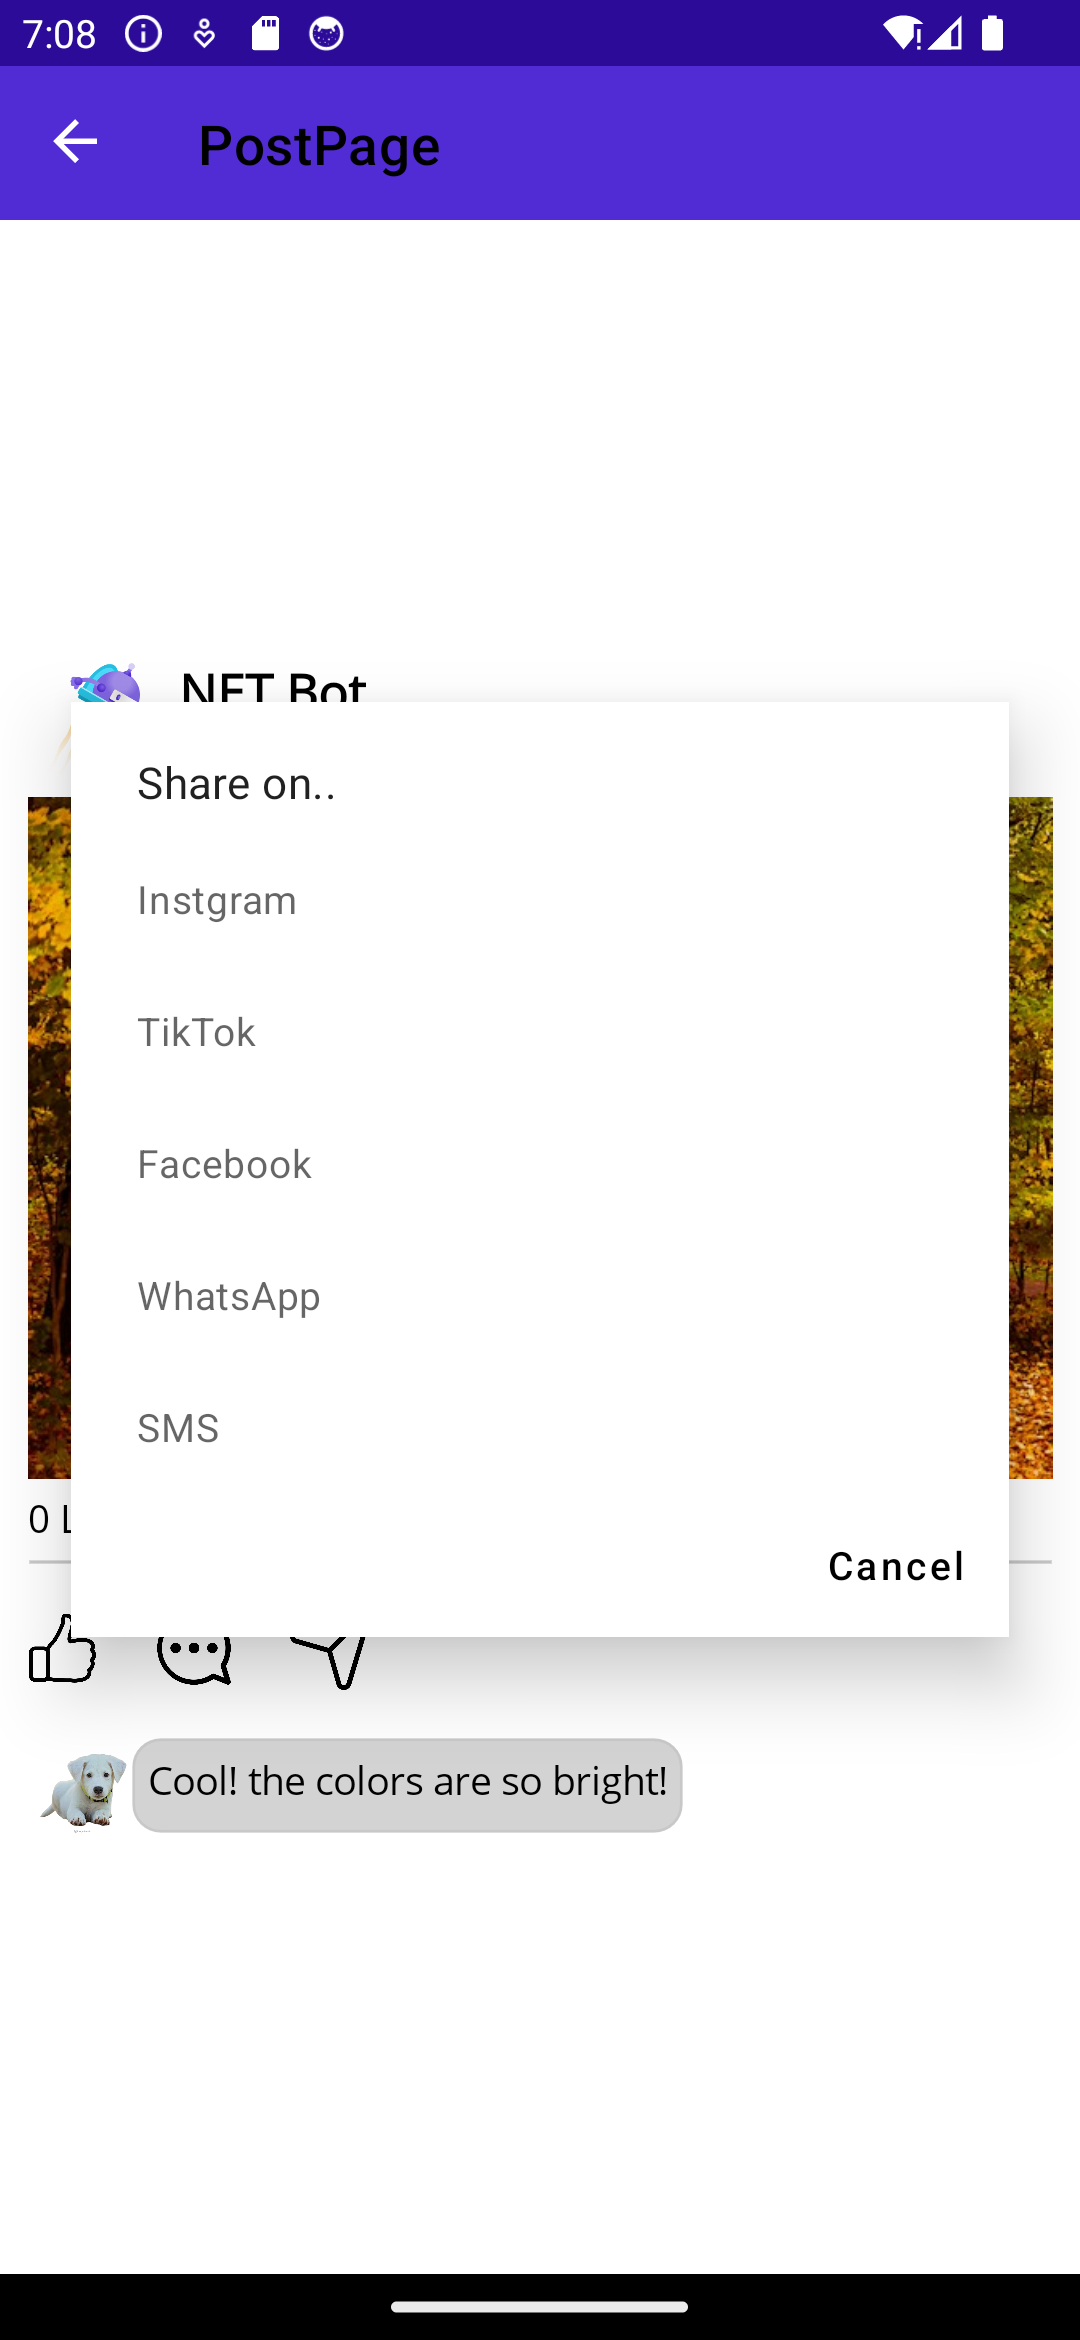
Like, Comment and Share:
This area is made up of another HorizontalStackLayout containing three ImageButton, which is an image that is clickable and can be linked to an event handler similar to a Button.
-
ImageButton:-
Source= “like.png” -
WidthRequest=”25” -
Clicked=”Btn_Like_Clicked” (add a new event handler)
-
-
ImageButton:-
Source= “comment.png” -
WidthRequest=”30” -
Clicked: “Btn_Comment_Clicked” (add a new event handler)
-
-
ImageButton:-
Source=”share” -
WidthRequest=”30” -
Clicked: “Btn_Share_Clicked” (add a new event handler)
-
Like Event Handler
- In the code behind, add a counter for the number of likes and make sure the likes label is updated every time the like button is clicked:
int likesCount = 0;
///...
private void Btn_LikeButton_Clicked(object sender, EventArgs e)
{
    ///...
}
Share Event Handler
- Modify the signature of the event handler to make it run asynchronously:
private async void Btn_ShareButton_Clicked(object sender, EventArgs e)
{
   ///\TODO...
}
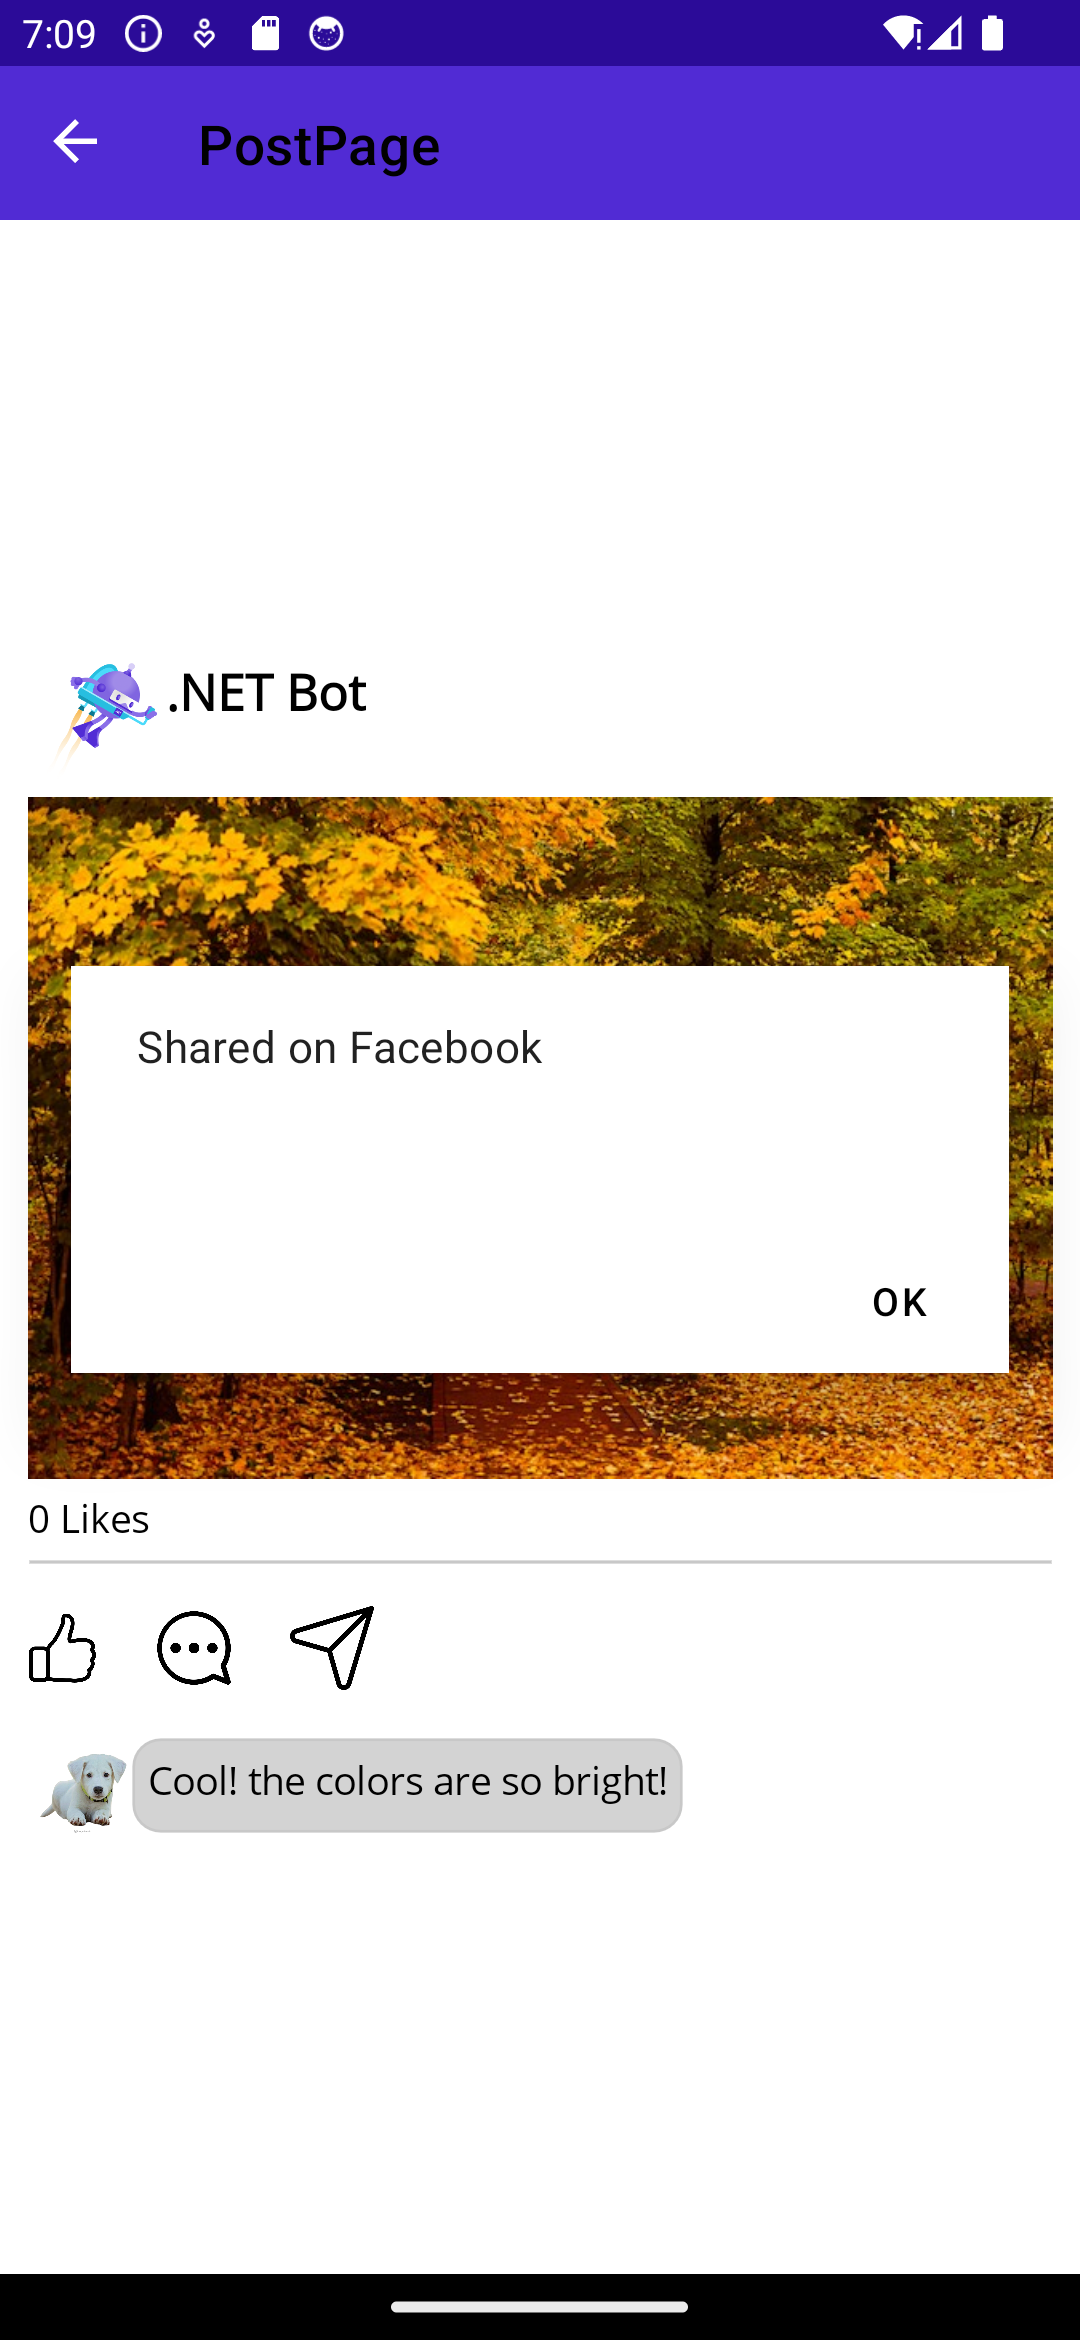
- Show a
DisplayActionSheetto allow the user to select the platform then showDisplayAlertto confirm that the post was shared on the selected platform. Read more about MAUI Pop-ups
Hint: Use the
awaitkeyword to save the returned user selection in astringvariable.
Comment Event Handler
For simplicity:
- push a
CommentPageon the stack (similar to theMainPageComment Page Button)
Comment section:
The comment section should contain a single HorizontalStackLayout with the following children:
-
Image:Source=”dog.png”
-
Border:-
BackgroundColor=”LightGray” -
StrokeShape=”RoundRectangle 10,10,10,10” -
Padding=”5” -
Child:
Label:Text=”Cool! the colors are so bright!”FontSize=”Medium”
-
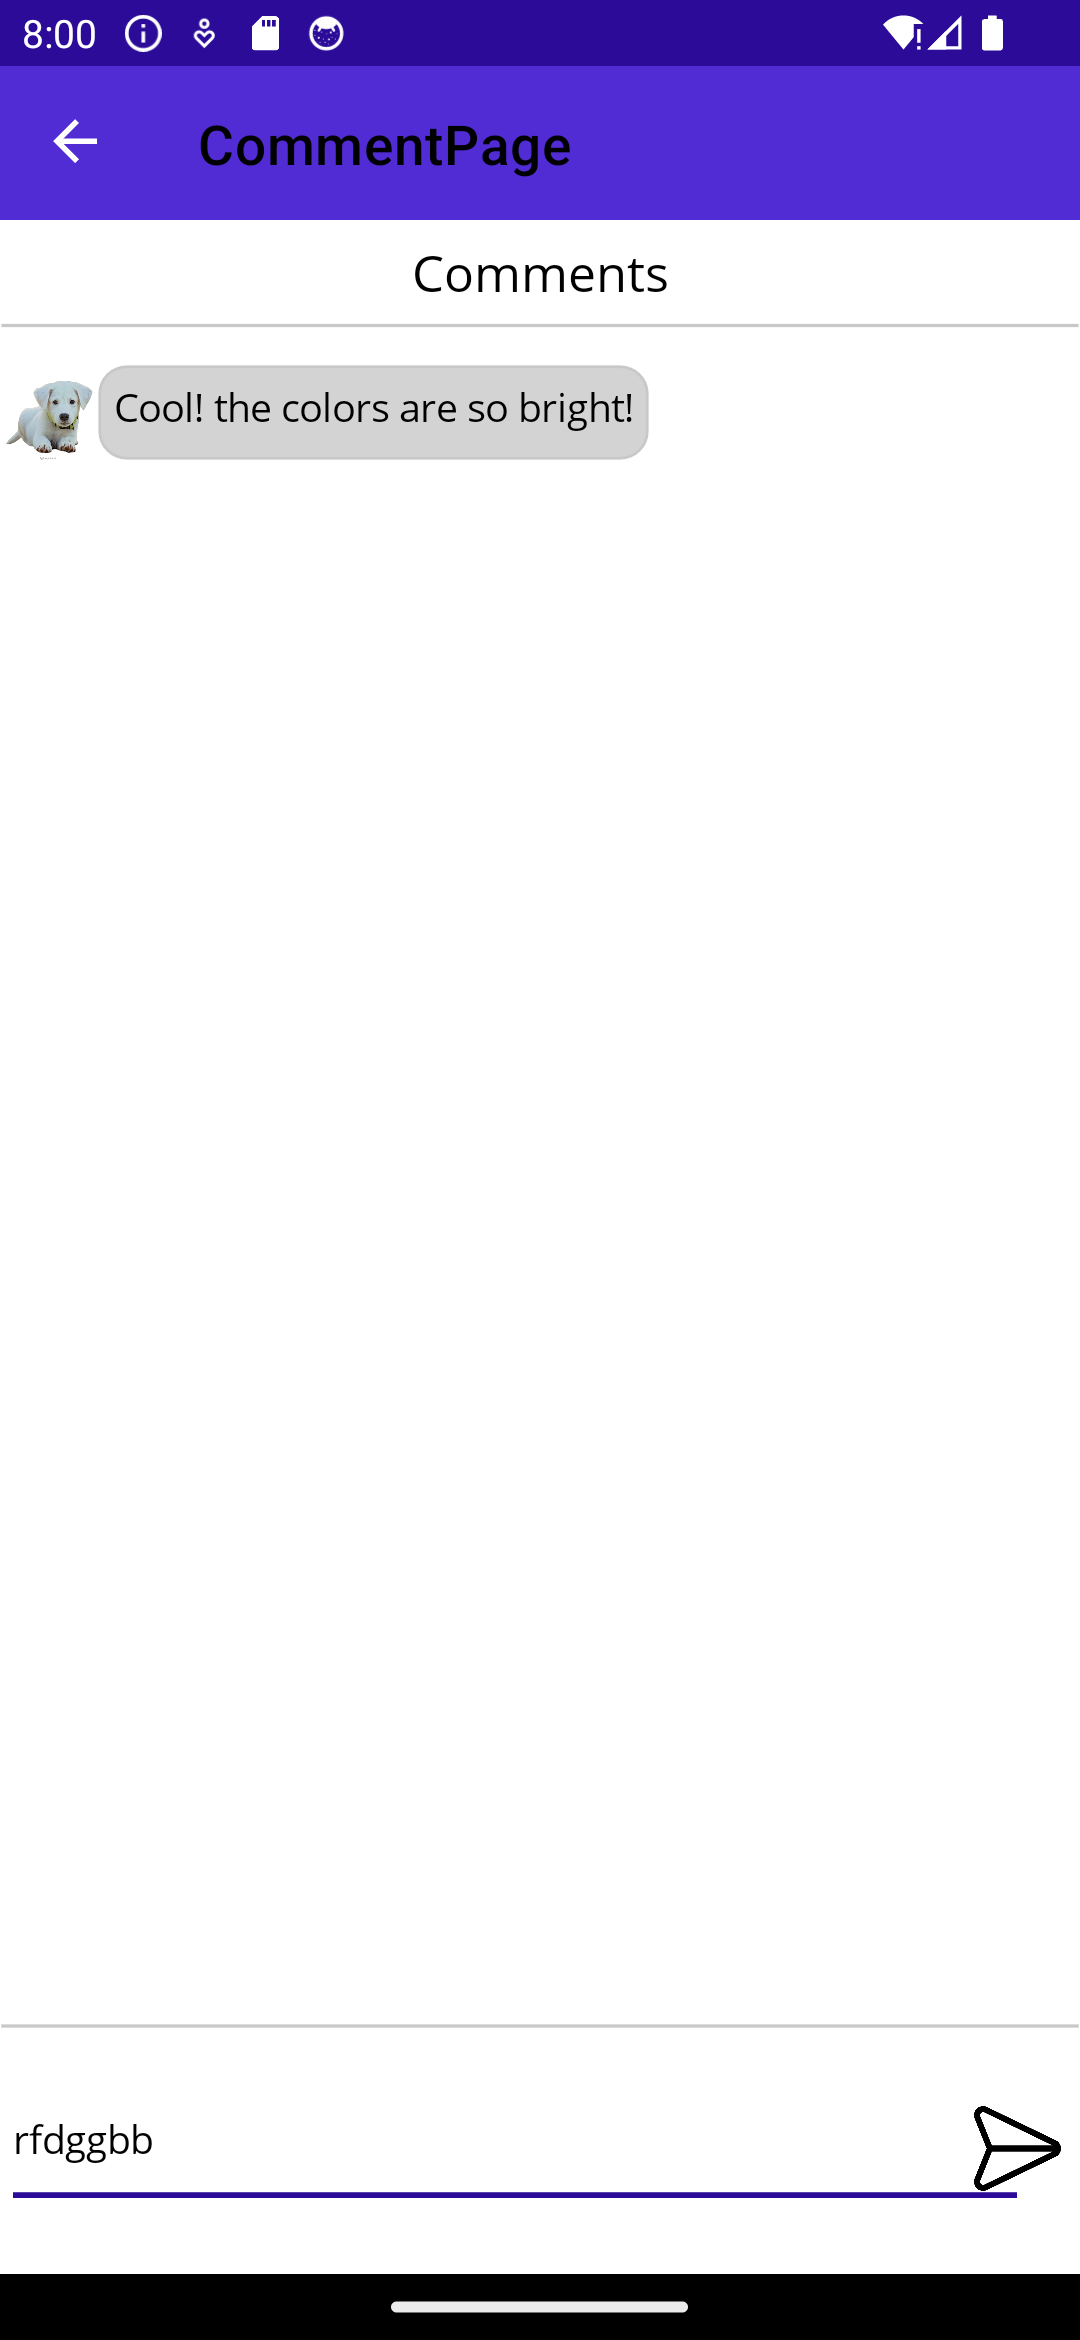
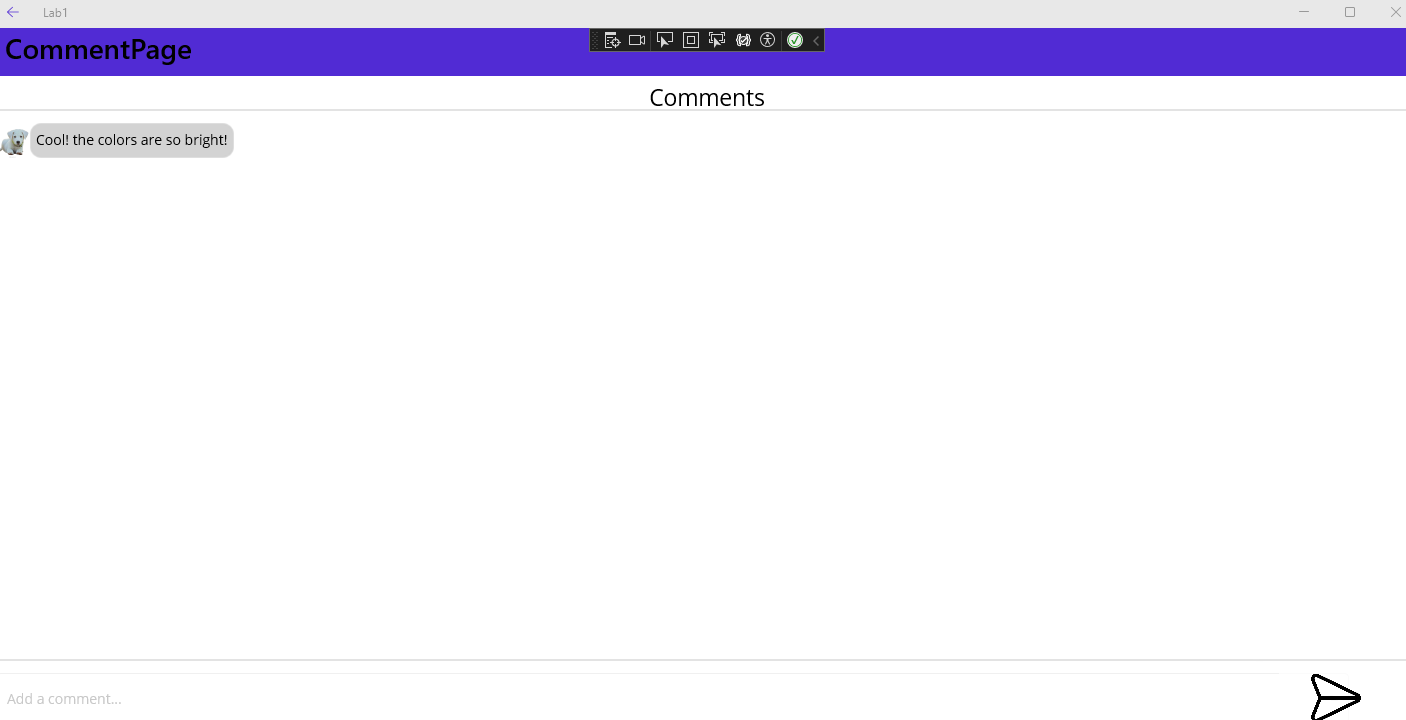
Modify the Comment Page
This page is composed of a title section at the top of the screen, a large middle section where the comments will appear and finally a text entry at the bottom part of the screen. This page should be composed of an AbsoluteLayoutcontaining the following items with the given bounds:
Hint: To combine two Absolute Layout flags, separate them by a comma: example: AbsoluteLayout.LayoutFlags = “HeightProportional, XProportional”
-
Label- x= 50%
- y= 1%
- Width = 200 pixels
- Height = 100 pixels
Text=”Comments”FontSize=”Medium”HorizontalTextAlignment=”Center”
-
Border- x= 50%
- y= 5%
- Width = 100%
- Height = 3 pixels
BackgroundColor=”Gray”
-
VerticalStackLayout- x= 50%
- y= 35%
- Width = 100%
- Height = 80%
- child :
HorizontalStackLayout(same as the comment in thePostPage
-
Border- x= 50%
- y= 88%
- Width = 100%
- Height = 3 pixels
BackgroundColor=”Gray”
-
Entry- x = 2%
- y = 97%
- Width = 95%
- Height = 50 pixels
Placeholder=”Add a comment…”
-
ImageButton- x= 98%
- y= 97%
- Width = 8%
- Height = 50 pixels
Source=”send.png”
The Comment Page should have the following appearance. Note: I am not expecting the Send button to be connected to an event handler.
End of the lab!
Grading Rubric
| Exercise | Expected Results | Points |
|---|---|---|
| Profile Page - Grid definition | Use of a Grid Layout | 0.25 |
| Profile Page - Element position | Correct positioning of the items on the grid | 0.25 |
| Post Page - Vertical and Horizontal Stacks | Use of a VerticalStackLayout and three HorizontalStackLayouts | 0.25 |
| Post Page - Like Button | Implementation of a likes counter in the code behind | 0.25 |
| Post Page - Share Button | Use of DisplayActionSheet and DisplayAction | 0.5 |
| Post Page- Comment Button | CommentPage is pushed on the stack when the comment button is clicked | 0.25 |
| Comment Page - Element position and sizing | Correct positioning and sizing flags | 0.25 |