Assignment 1 - Email App milestone 1
- Worth: 10%
- 📅 Due: March 21, 2024 @ 23:59.
- 🕑 Late Submissions: Deductions for late submissions is 10%/day. To a maximum of 3 days. A a grade of 0% will be given after 3 days.
- 📥Submission: Submit through GitHub classroom.
Project Preparation
- Check the
GitHubclassroom link shared with you on your section’s Teams channel and accept the assignment. - Once your private repo is created, clone it to your computer.
- The repo should contain a
.NET MAUI Appstarter code using .NET Core 7.0 - In the cloned folder created the following folders:
- Organize your Views inside a folder Views
- Organize your C# classes inside a folder named Models
- Organize your data repos classes inside a folder named DataRepos
- Organize your services inside a folder named Services
- Organize your converters inside a folder named Converters
Objective
In this first assignment, you are tasked with creating a simple Email Client App offering various functionality. This is the first milestone of the assignment; you will have to create the various views and models used by your app. The app will not be fully functional but will provide a starting point for the following assignment.
- Design a mockup Email app using the .NET MAUI framework
- Design and implement a view using a
CollectionView - Use the
INotifyPropertyChangedinterface - Use shell navigation
- Create models
- Use data binding
- Use converters
- (optional) Use templated views. Read more about ContentView
User Needs
The Email app must:
-
Display a list of emails.
-
Allow the user to switch between various views (Inbox, Archive, Sent, Bin) Note: The additional views will be completed in the next milestone.
-
Offer a search function to search through the emails titles, contents and senders.
-
Differentiate visually between Read/Unread emails
-
Differentiate visually between favorite/ non-favorite emails
-
Offer a swipe function to archive, add to favorite or delete emails
-
Offer tap functionality to display a detail view of the email
-
Offer a view to write new emails
-
Offer a functionality to forward emails
You do NOT have to implement:
- Authentication of a user
- Connection to a mail server
- Send/Receive emails from a server
To mockup data use a static
DataRepo
User stories
In a separate word document, PDF or markdown file
- Write at least 5 simple user stories to translate the user needs above
- The title of your user stories should follow the format: As a user, I want to
- Each user story should be accompanied with an acceptance criteria
Model Classes
Organize the following software requirements and related them to the user stories you have created
Create an Email model with the following specifications:
-
Implements the
INotifyPropertyChangedfromSystem.ComponentModel-
Implement the event
PropertyChanged -
Install the NuGet package PropertyChanged.Fody which will auto generate notification on property changes. This way you will not need to create and call the
OnPropertyChanged()method in every setter.
-
-
Public properties of this model are:
| Name | Type | Description |
|---|---|---|
Id |
string |
A unique identifier for an email |
Date |
DateTime |
The date and time of sending the email |
Subject |
string |
The subject of the email |
Body |
string |
The body/content of the email |
SenderAddress |
MailAddress (add using System.Net.Mail) |
The email address of the sender |
RecipientAddress |
List<MailAddress> |
The email addresses of the recipients |
IsRead |
bool |
A flag used to decipher between read and unread emails |
IsFavorite |
bool |
Flag used to decipher between starred and regular ones |
IsArchive |
bool |
Flag used to decipher between archived emails and non-archived |
- Methods:
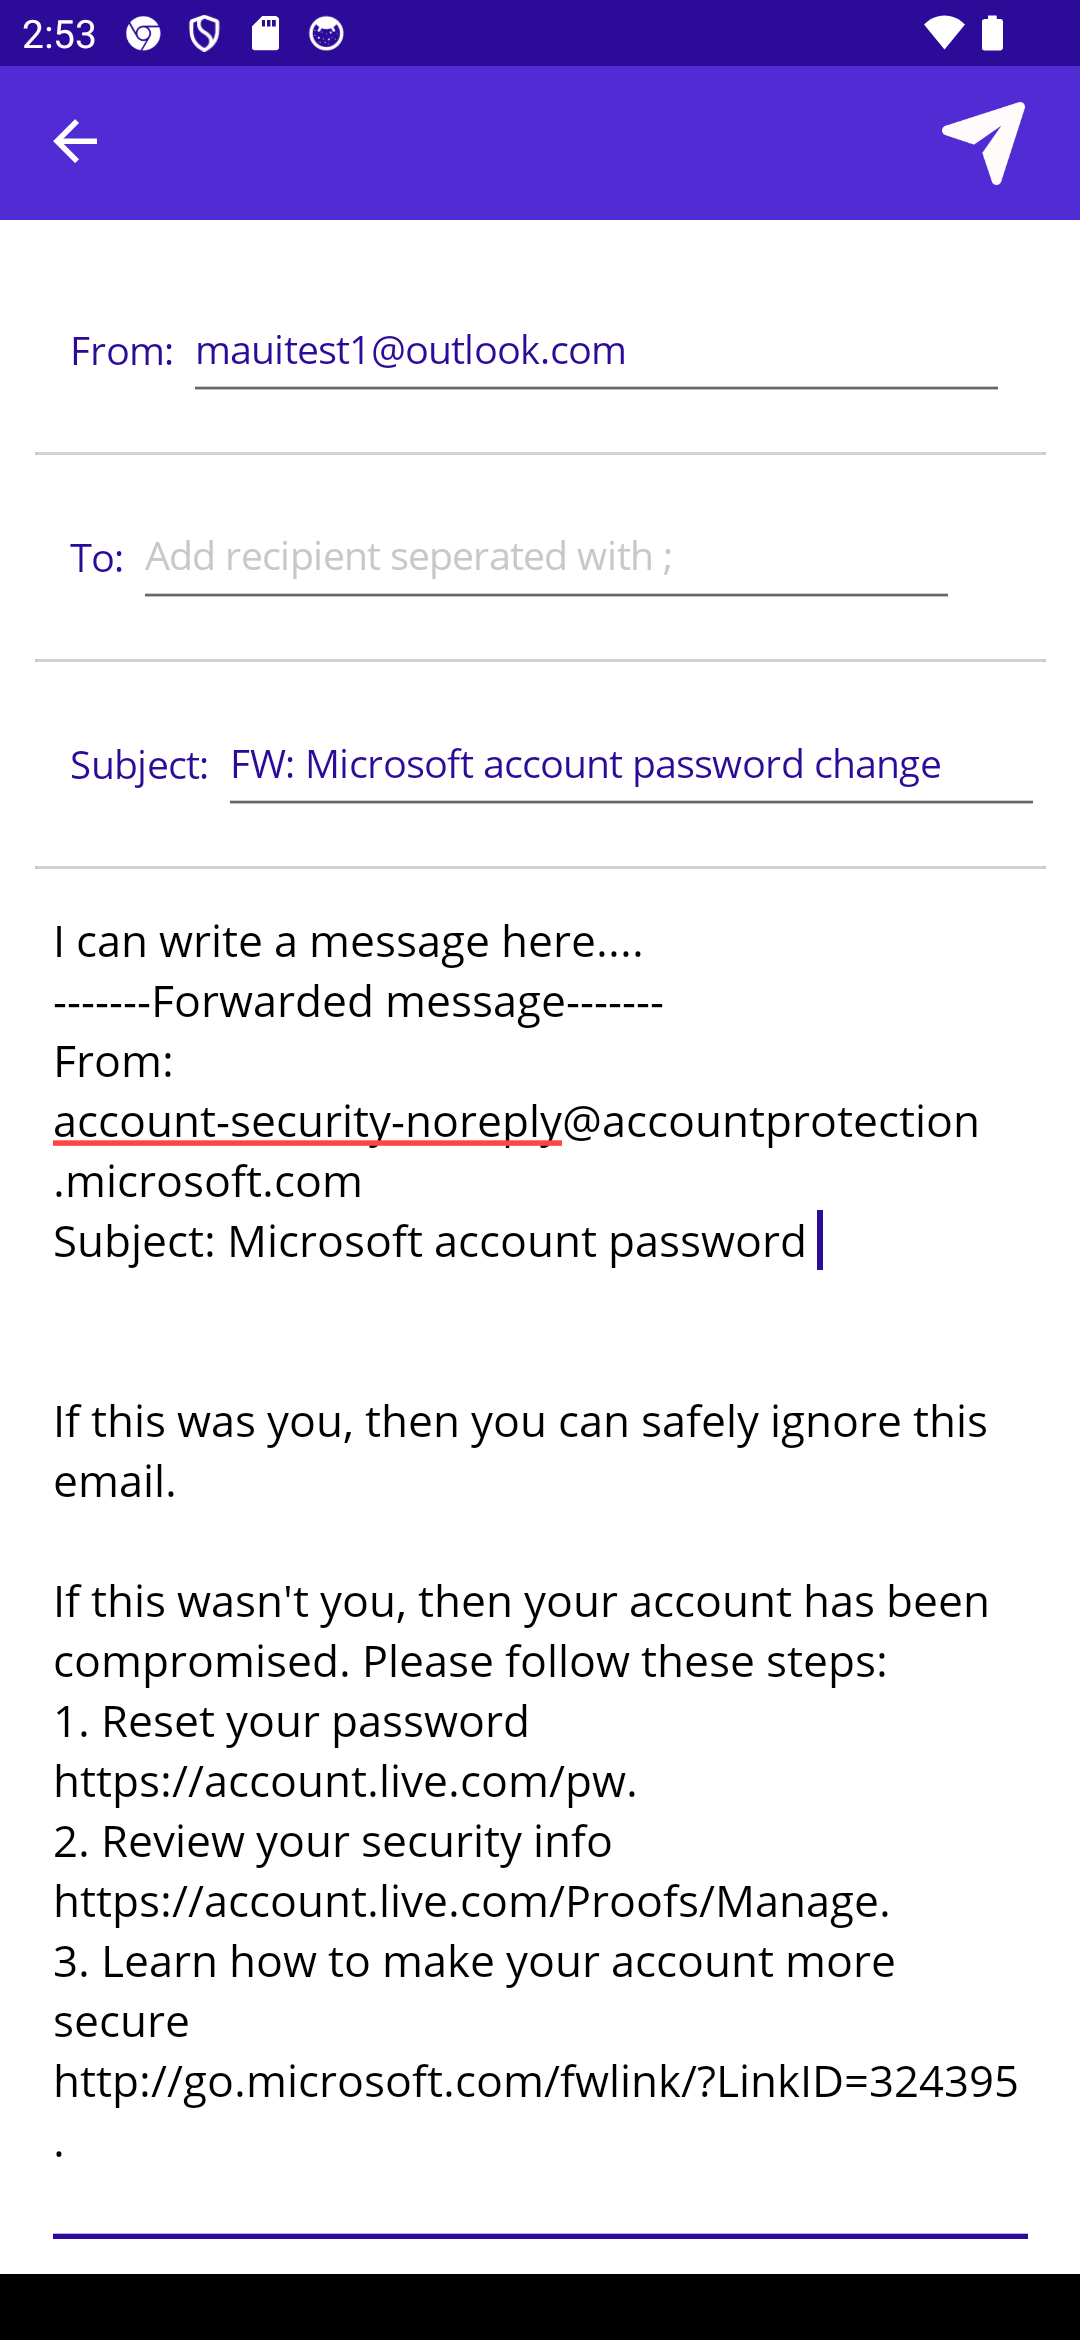
public Email GetForward(): This method returns a new Email with a forwarded body and subject as such:
| Original Email | Forwarded Email |
|---|---|
| Subject: Meeting next week | Subject: FW: Meeting next week |
| Body: Hello Team, we will have to meet urgently next week for the …. | Body: ————Forwarded message———- From: regionalmanager@company.com To: team@company.com Hello Team, we will have to meet urgently next week for the …. |
- Feel free to add methods and properties that are useful for other pages you’ve defined. In a future milestone, we will be adding the concept of Folder to organize emails.
Data Repo
Create a non-static EmailRepo class
We will use the EmailRepo class as a static variable shared across all views. It is important that any modifications done to the emails be done through this Repo to avoid conflictual updates across the views.
This class will eventually be using the email service to download emails, send them or modify their containing folder.
- Implements the
INotifyPropertyChangedfromSystem.ComponentModel
- Implement the event
PropertyChanged - Install the NuGet package PropertyChanged.Fody which will auto generate notification on property changes. This way you will not need to create and call the
OnPropertyChanged()method in every setter.
- Public property
ObservableCollection<Email>:Emails: Represents the entire emails in the inbox
- Private methods:
-
void AddTestData(): A method which creates mock data.Note: This method is temporary to help you test the first milestone of this app. We will eventually remove it.
- Public methods:
public void MarkRead(Email email): Sets theIsReadproperty totruepublic void MarkUnread(Email email): Sets theIsReadproperty tofalsepublic void AddFavorite(Email email):Sets theIsFavoriteproperty totruepublic void Archive(Email email): Removes the email from the Emails list. We will later use the email service to mark the email for archive on the mail server.-
public void Delete(Email email): Removes the email from the Emails list. We will later use the email service to mark the email for deletion on the mail server. -
public IEnumerable<Email> SearchFromString(string filterString): Returns all emails containing thefilterStringHint: Use a Linq method to search for emails whose subjects, sender emails or body contain the filterString.
- Create a static instance of this class in the
App.xaml.cs:
public static EmailsRepo Inbox = new EmailsRepo();
- The Email list can now be accessed in the views (code behind) with ` App.Inbox.Emails`
Helpful Tips
A few new concepts are introduced in this design:
Value Converters
What are “Binding Value Converters”?
-
.NET Multi-platform App UI (.NET MAUI) data bindings usually transfer data from a source property to a target property, and in some cases from the target property to the source property.
-
This transfer is straightforward when the source and target properties are of the same type, or when one type can be converted to the other type through an implicit conversion.
When that is not the case, a type conversion must take place.
To achieve this task you need to write some specialized code in a class that implements the IValueConverter interface. Classes that implement IValueConverter are called value converters, but they are also often referred to as binding converters or binding value converters.
Example
(Do not type this code into your project. This is only for explanation purpose and will be discussed in class)
-
Suppose you want to define a data binding where the source property is of type
intbut the target property is abool. -
You want this data binding to produce a
falsevalue when the integer source is equal to 0, andtrueotherwise. This can be achieved with a class that implements theIValueConverterinterface:public class IntToBoolConverter : IValueConverter { public object Convert(object value, Type targetType, object parameter, CultureInfo culture) { return (int)value != 0; /* - 'value' is the passed property from xaml, hence requires casting - Casting could fail, so adding a try/catch with a default return value is a good programming practice to avoid app crashes */ } public object ConvertBack(object value, Type targetType, object parameter, CultureInfo culture) { return (bool)value ? 1 : 0; /* Converting back to original value. Not all conversions are resersable */ }How to use the created converter class in your view
xamlcode?<!-- 1. Add the converters namespace to the XAML markup extensions --> <ContentPage ... xmlns:converters="clr-namespace:ProjectNamespace.Converters" ...> <StackLayout Padding="10, 0"> ... <!-- 2. Assign the 'Converter' property --> <Button Text="Save" IsEnabled="{Binding Value, Converter={converters:intToBool}}" /> ... </StackLayout> </ContentPage>
Dependency injection
In this assignment you will be reading/writing emails displayed in a list of email. The list view of the emails must be able to pass data to the read and write pages.
Given that data must be sent from an origin class A to a destination class B.
-
First Approach: Create a public property or method in destination class
B. ClassAwould create an instance of of classBand use the property or method to set or pass the data to the instance. This approach is acceptable if the data is not required to create the object of type classB:var b = new B(); b.Data = data; // b.SetData(data) -
Second Approach: Create a constructor in class
Bthat accepts the data as an arguments. The constructor will be responsible for saving the data for later use if needed.var b = new B(data);The second approach is preferred if the object B requires the data to be constructed.
UI Design
-
Create the following pages:
InboxPage(which will display emails in the inbox)SentPage(empty for this milestone, will be the placeholder for the list of sent emails)ArchivePage(empty for this milestone, will be the placeholder for the list of archived emails)- Feel free to add more pages that an email app should contain.
ReadPage(displays the details of the email)WritePage(displays a form to write a new email)
-
Use a flyout menu or a tab bar to navigate between the various email folder pages:
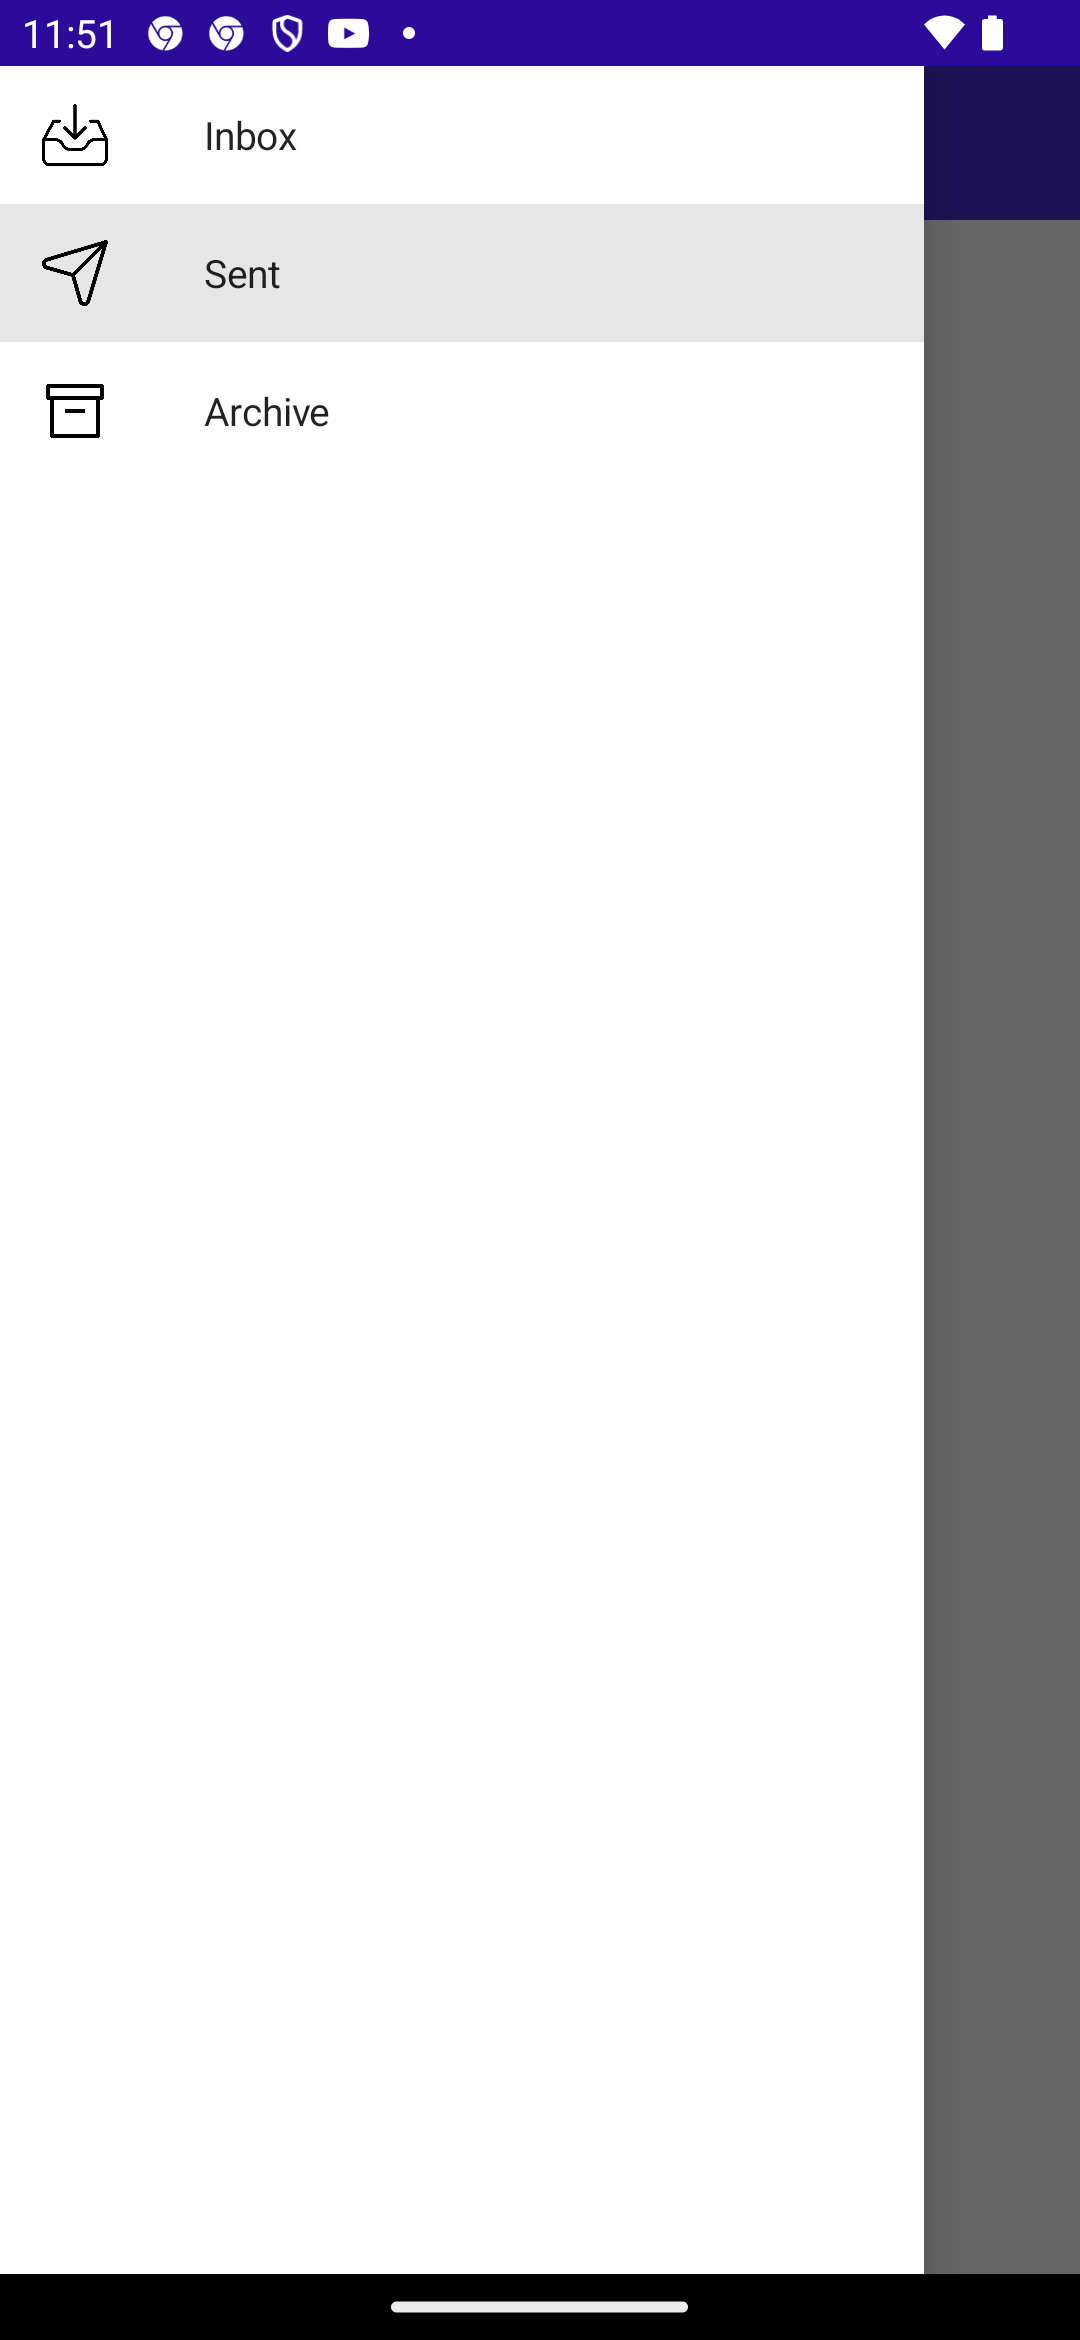
-
In the Inbox view, you should include an
SearchBarwithin theNavBar, this will serve as a search bar to filter out emails:Hint: Use
Shell.TitleViewto include your search bar -
In the inbox view, use a
CollectionViewof a collection of email items -
Use a
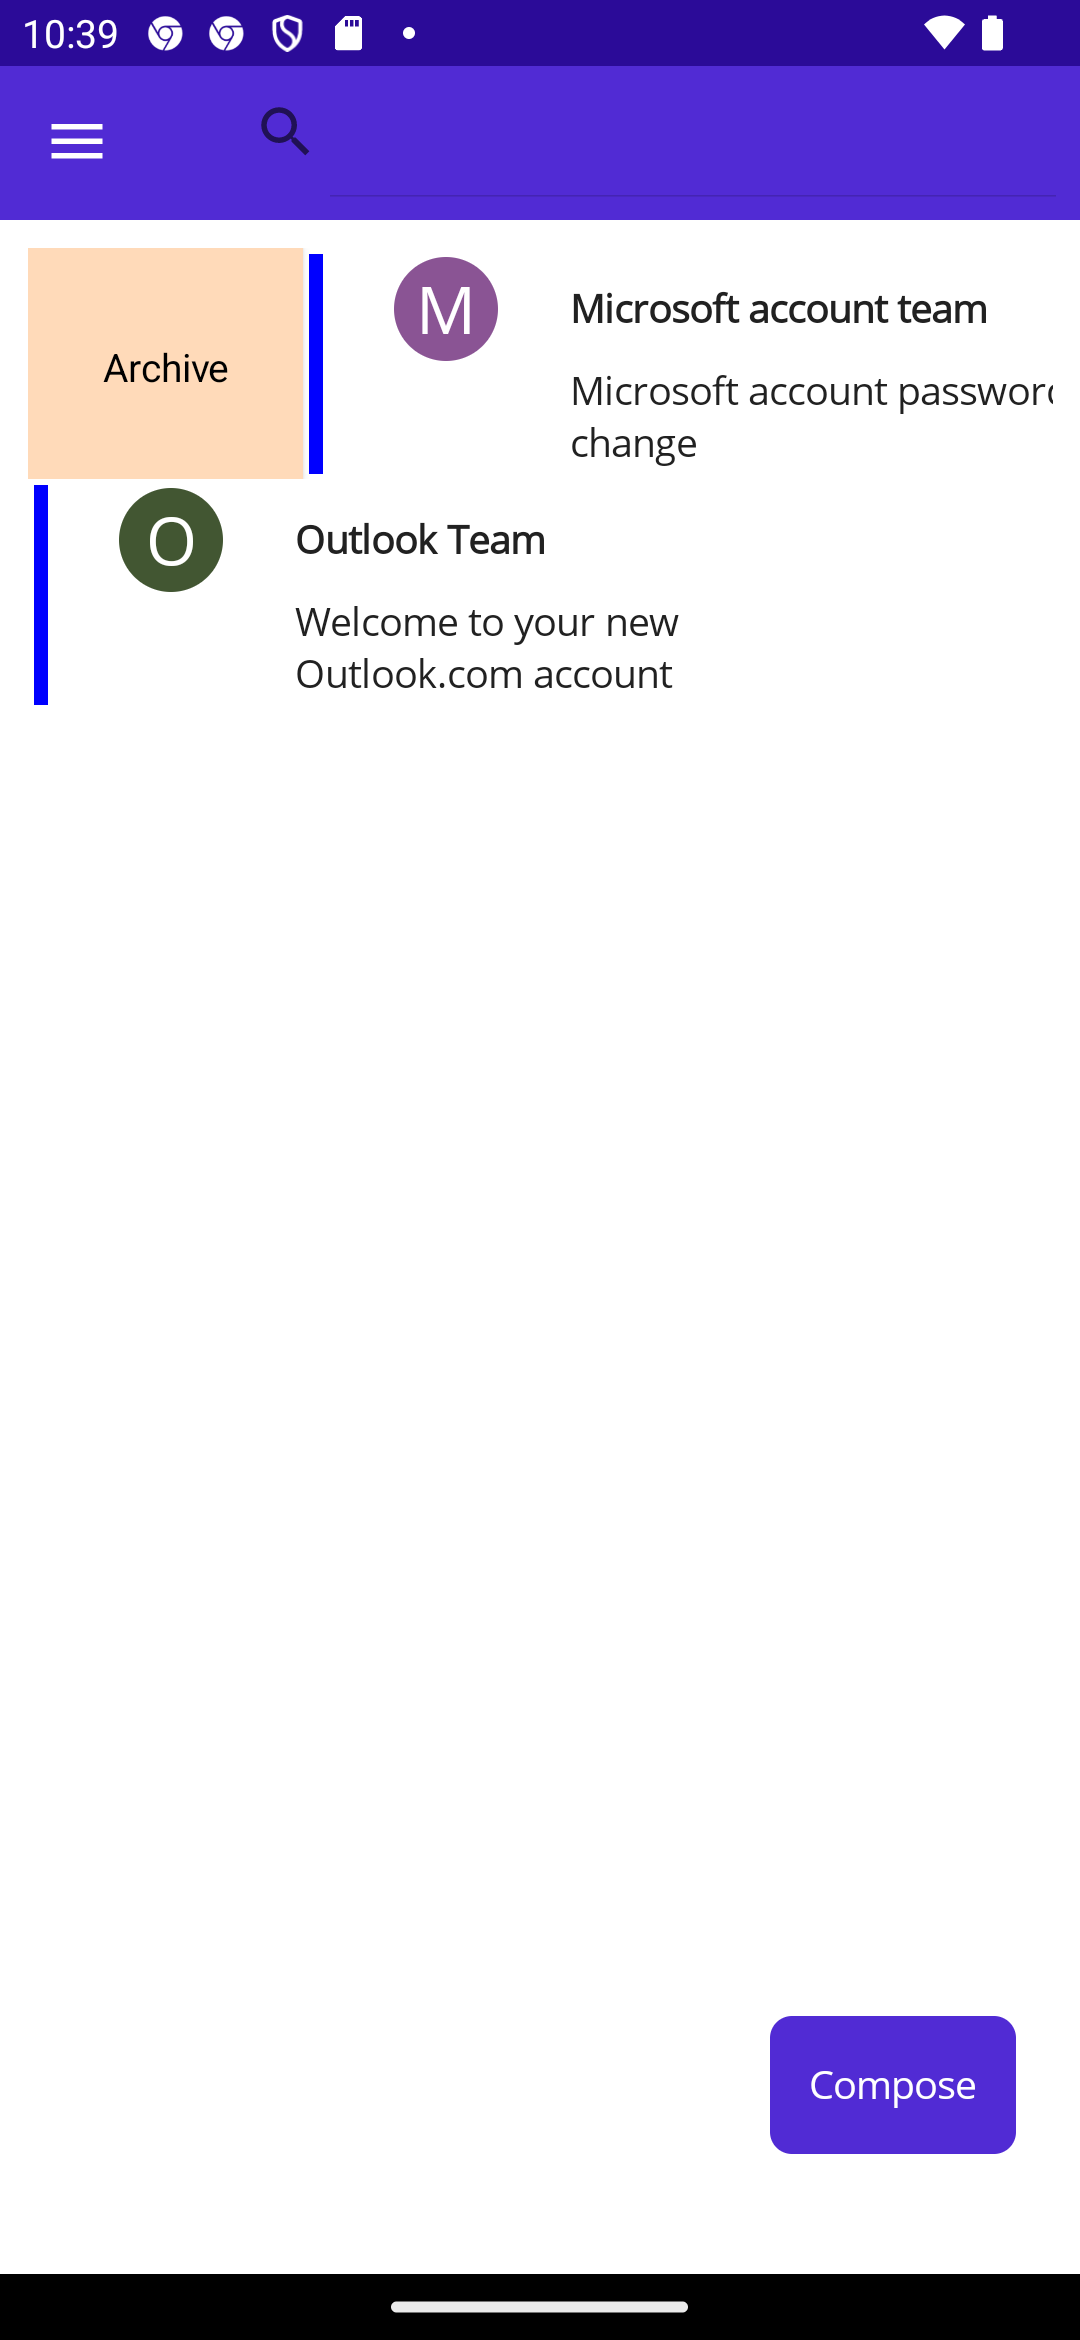
<SwipeView>as aDataTemplateof theCollectionView.ItemTemplate:-
SwipeView.LeftItemsshould include a singleSwipeItemtitled “Archive” -
SwipeView.RightItemsshould include twoSwipeItems titled “Delete” and “Favorite” as shown below. -
To handler the swipe click you can do this in two different ways:
-
Way 1: Adding new event handlers for the
Clickedevent of every Swipe Item. -
Within each event handler you must cast the
senderobject as aSwipeItemand use theBindingContext:
-
 ```csharp
 var swipe = (sender as SwipeItem);
 Email item = swipe.BindingContext as Email;
 ```
-
Way 2: This strategy has some overhead but can be very useful if you chose to use templated views that you can reuse. Using
Commands andCommandParameter: -
This method uses
Bindingto bind a command defined in the code behind to theXAML:public ICommand DeleteCommand {get; set;}Command="{Binding DeleteCommand} -
You can pass the swiped email itself as a command parameter
CommandParameter="{Binding .} -
To implement a simple handler read Microsoft’s documentation
-
To perform the actions use the Repo’s methods:
-
AddToFavorites() -
Archive() -
Delete()
-
-
-
Use a
Gridto define the layout of theCollectionView.ItemTemplate -
Add a
<GestureRecognizer>on theGrid:-
Add a
TapGestureRecognizer -
Add a new event on the
Tappedevent to get the clicked emailHint: In the event handler, cast the sender into a Grid object similarly to the example of the SwipeItems.
-
When tapped a new
ReadPageshould be created the selected email should be passed as argument.
-
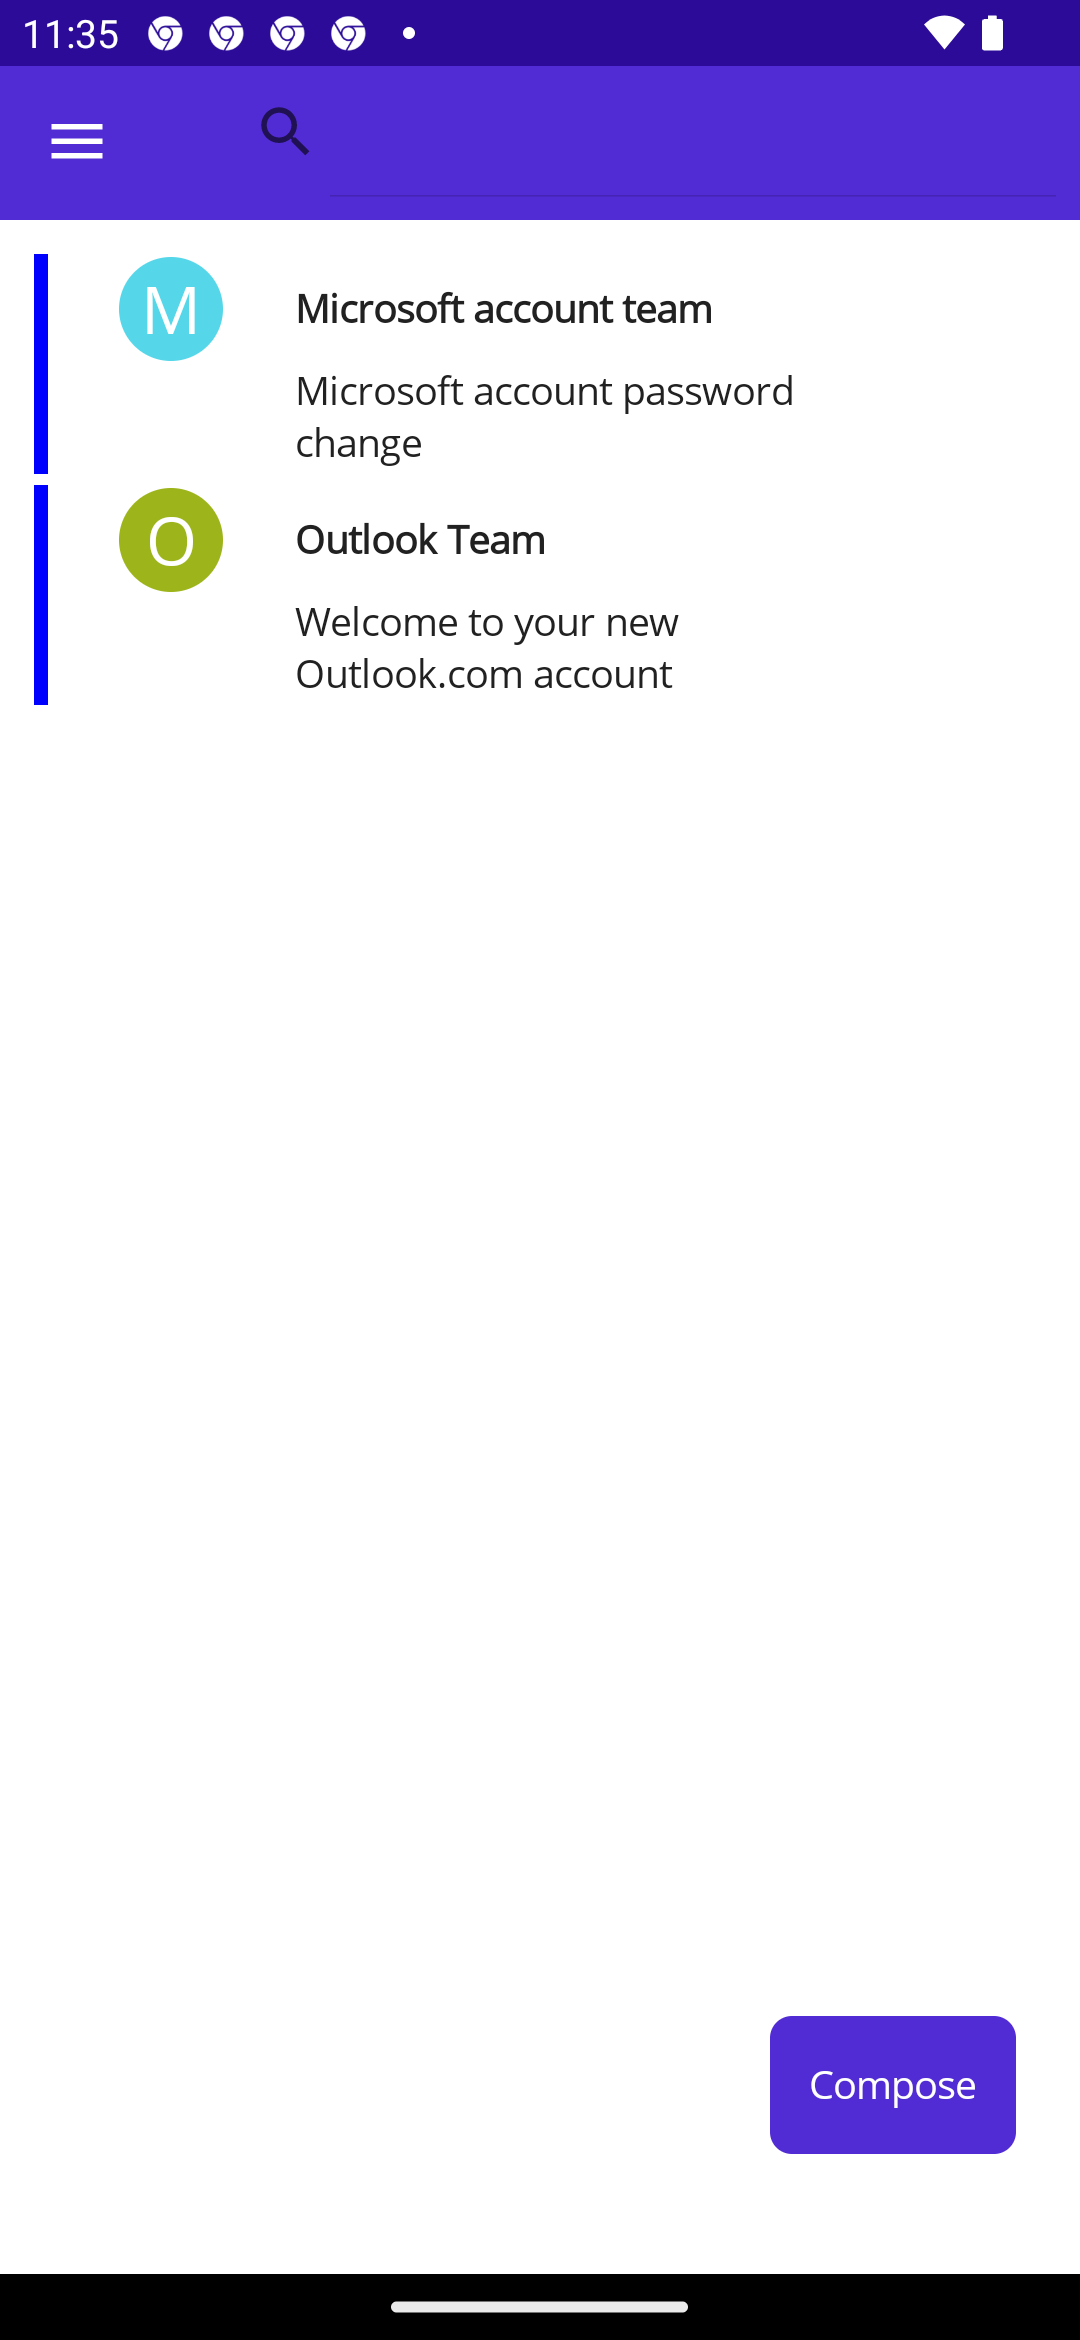
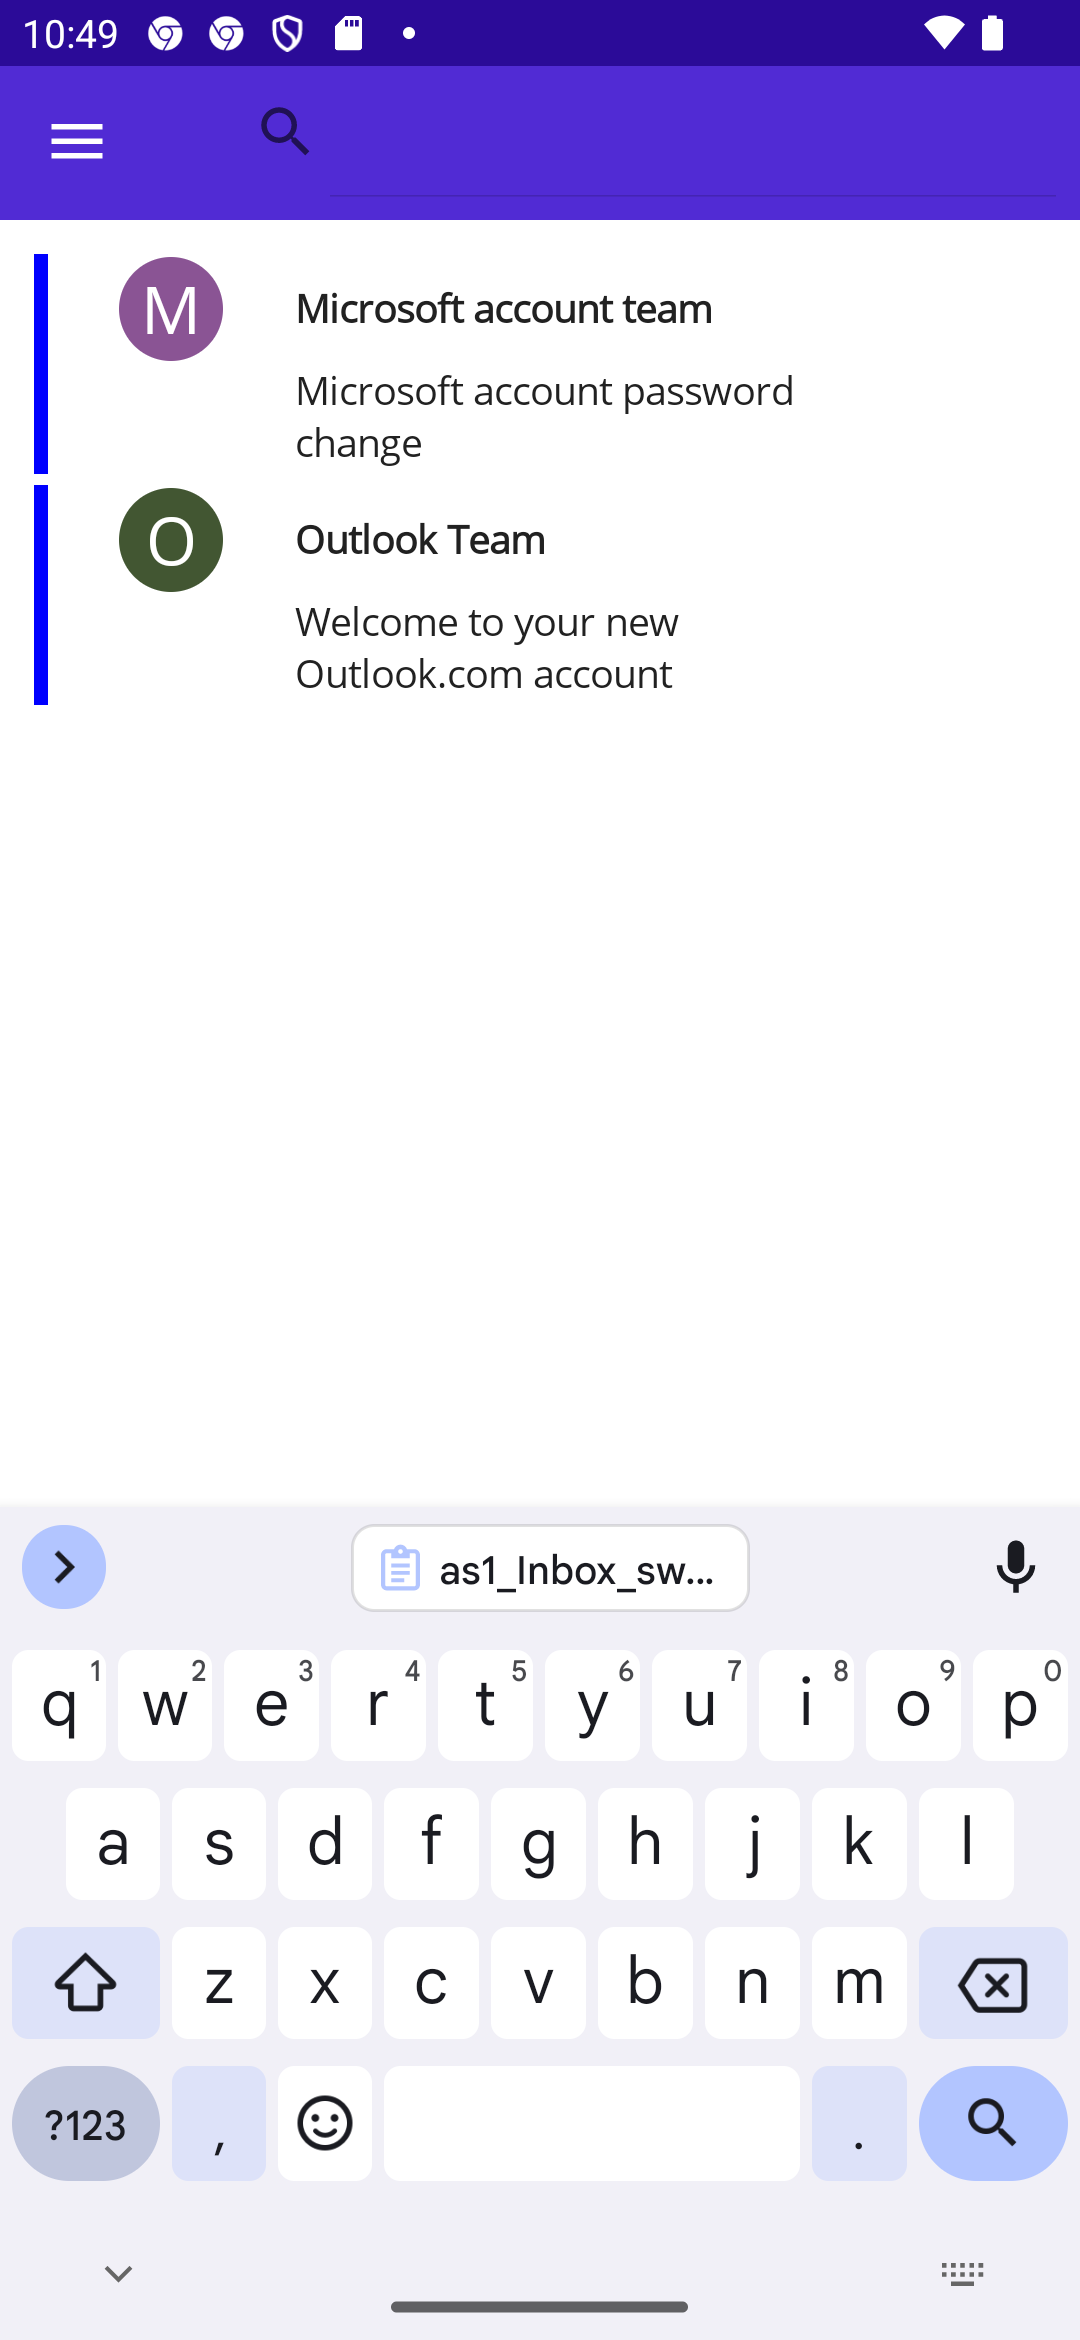
Figure 2: Inbox Page
-
Add a
Labelwith Text “Favorite” and who’s visibility is bound to theIsFavoriteboolean of theEmailmodel -
Use a rounded
FrameorBorderwith the first character of theDisplayNameas the user icon.For example: Letter “O” for Outlook Team
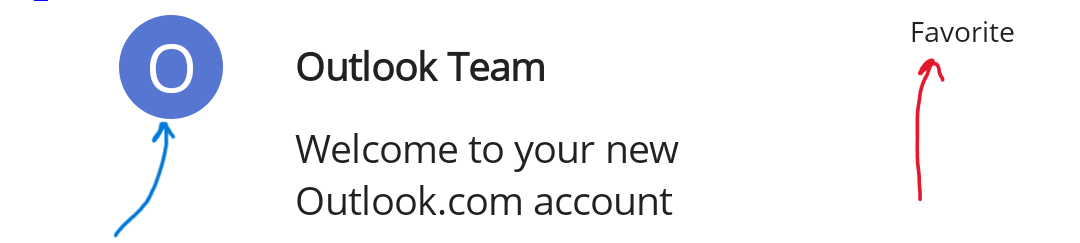
Hint: You must use a converter within the Binding of the user icon label. This converter must return the first character of the display name:
-
(Optional) Generate a background color for the
Frameof the user icon based on the user email address.Hint: You must a converter and find a way to translate letters to color value.
-
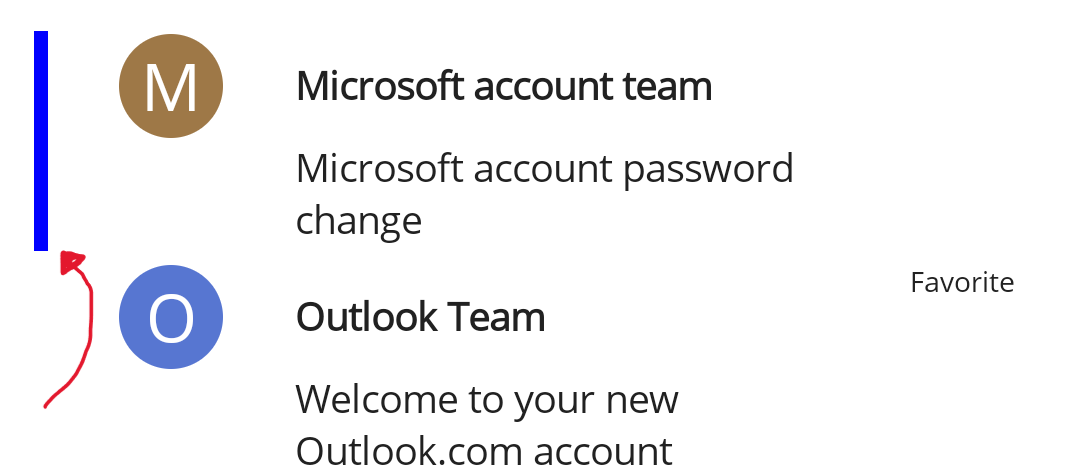
Unread emails (never tapped) should appear differently. Feel free to use any method to distinguish them
IsReadHint: Use Converters to translate the IsRead property of an email into a UI attribute such as a color or a text style, etc..
Figure 3: Unread emails are marked with a blue line, read emails have a transparent line
-
The “Compose” button should asynchronously push a new
WritePage:ReadPage
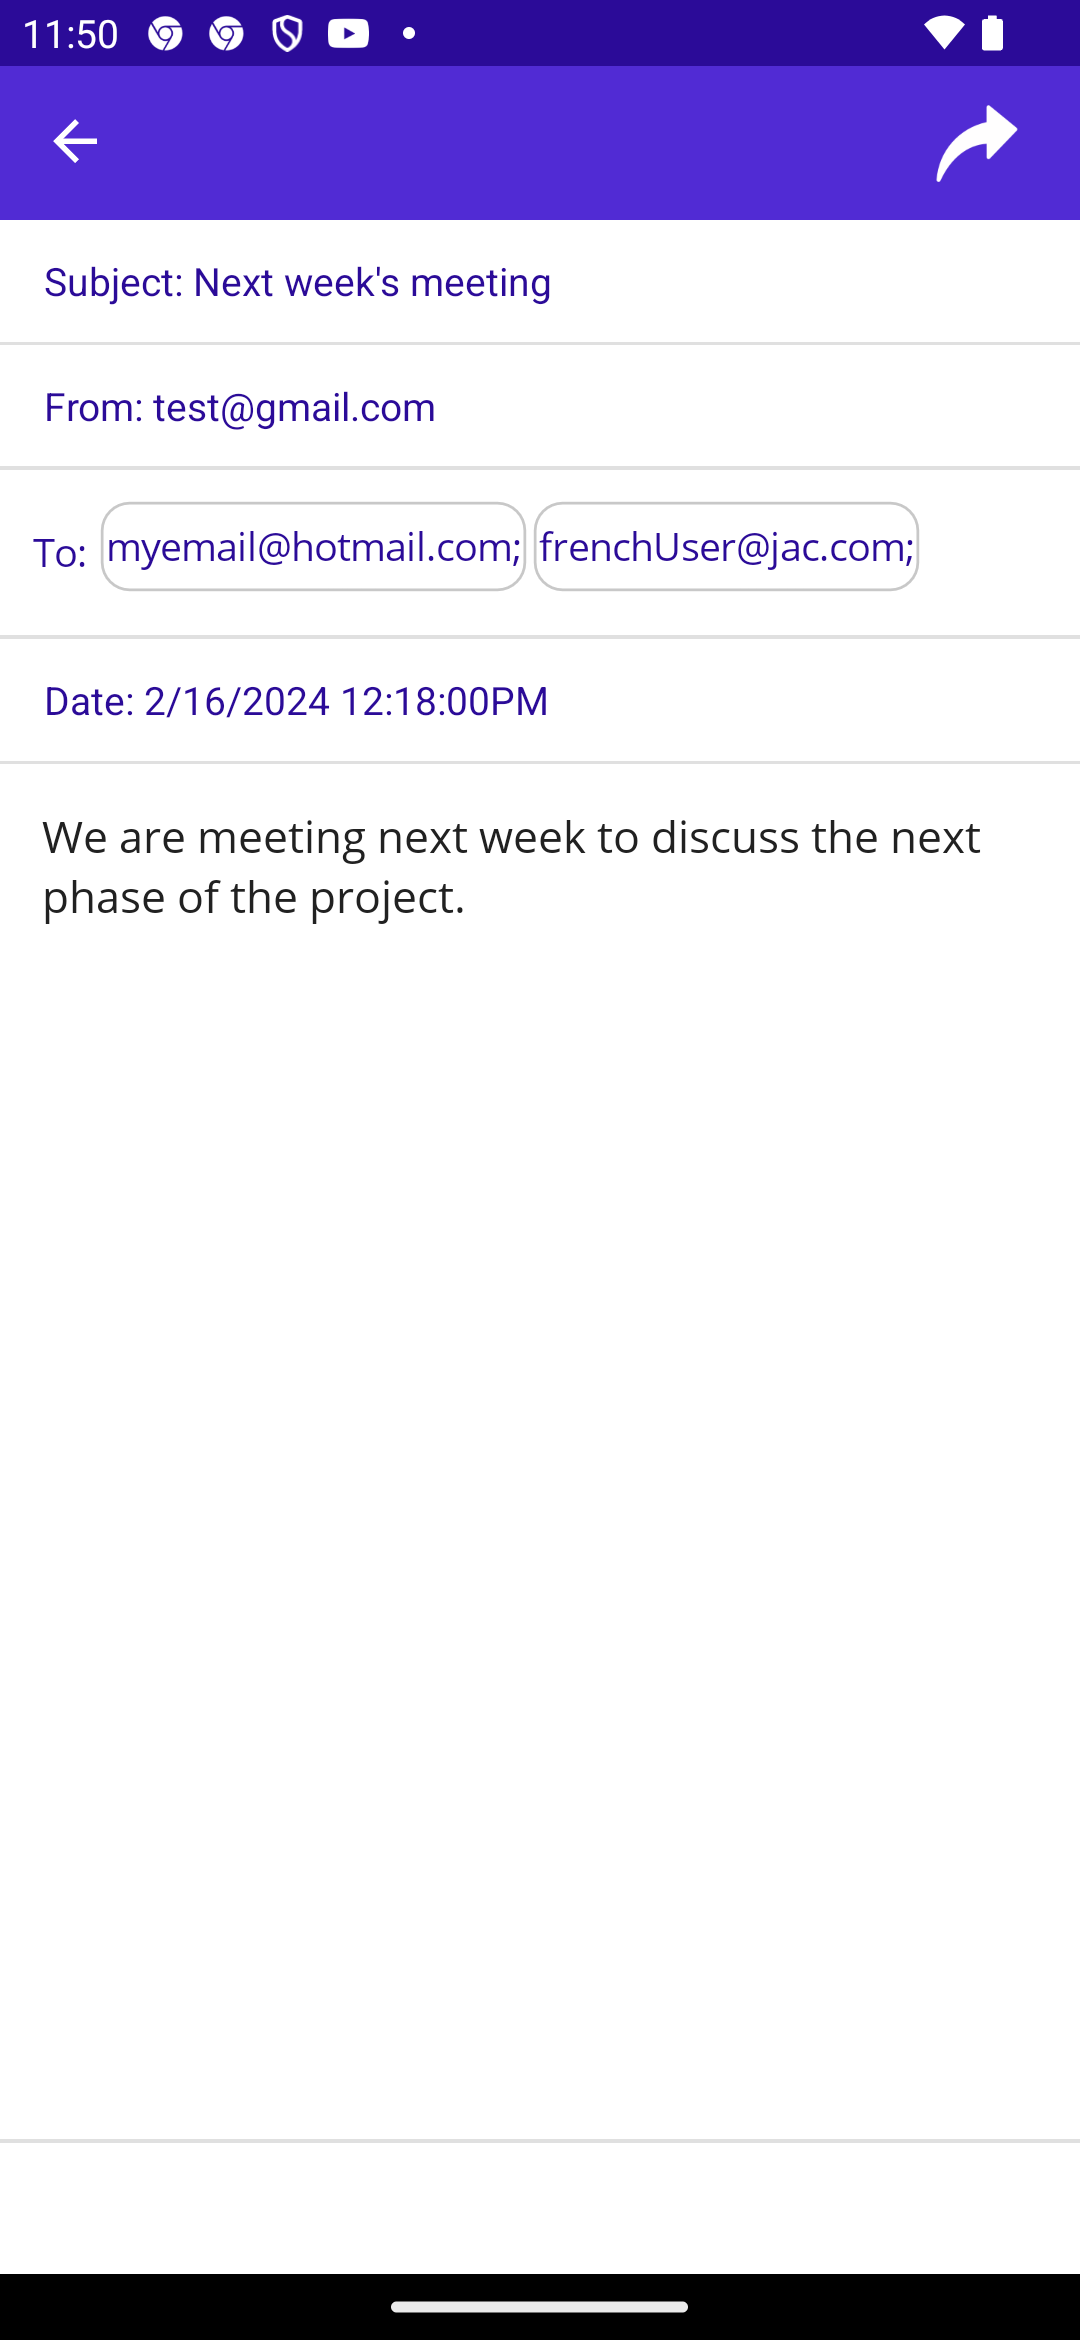
Code behind:
- The constructor of the
ReadPageshould receive anEmailobject as argument. - The email must be marked as
Read - Use this email as
BindingContext
XAML:
- Contains:
-
A
Labelto indicate theSubject -
A
Labelto indicate theSenderEmail.DisplayName -
Labels for each
RecipientEmail:Hint: Use
BindableLayoutor aCollectionViewwith theItemsSourceset to the list of recipients. -
A
Labelto indicate the date -
A
LabelorEditorto display the body of the email. -
Feel free to improve the design to your linking.
-
- The constructor of the
Figure 4: ReadPage template
- Implement a “Forward” button to:
- Use the
GetForward()method to get the forwarded email. - Push a new
WritePageproviding a forwarded email as argument to the constructor.
- Use the
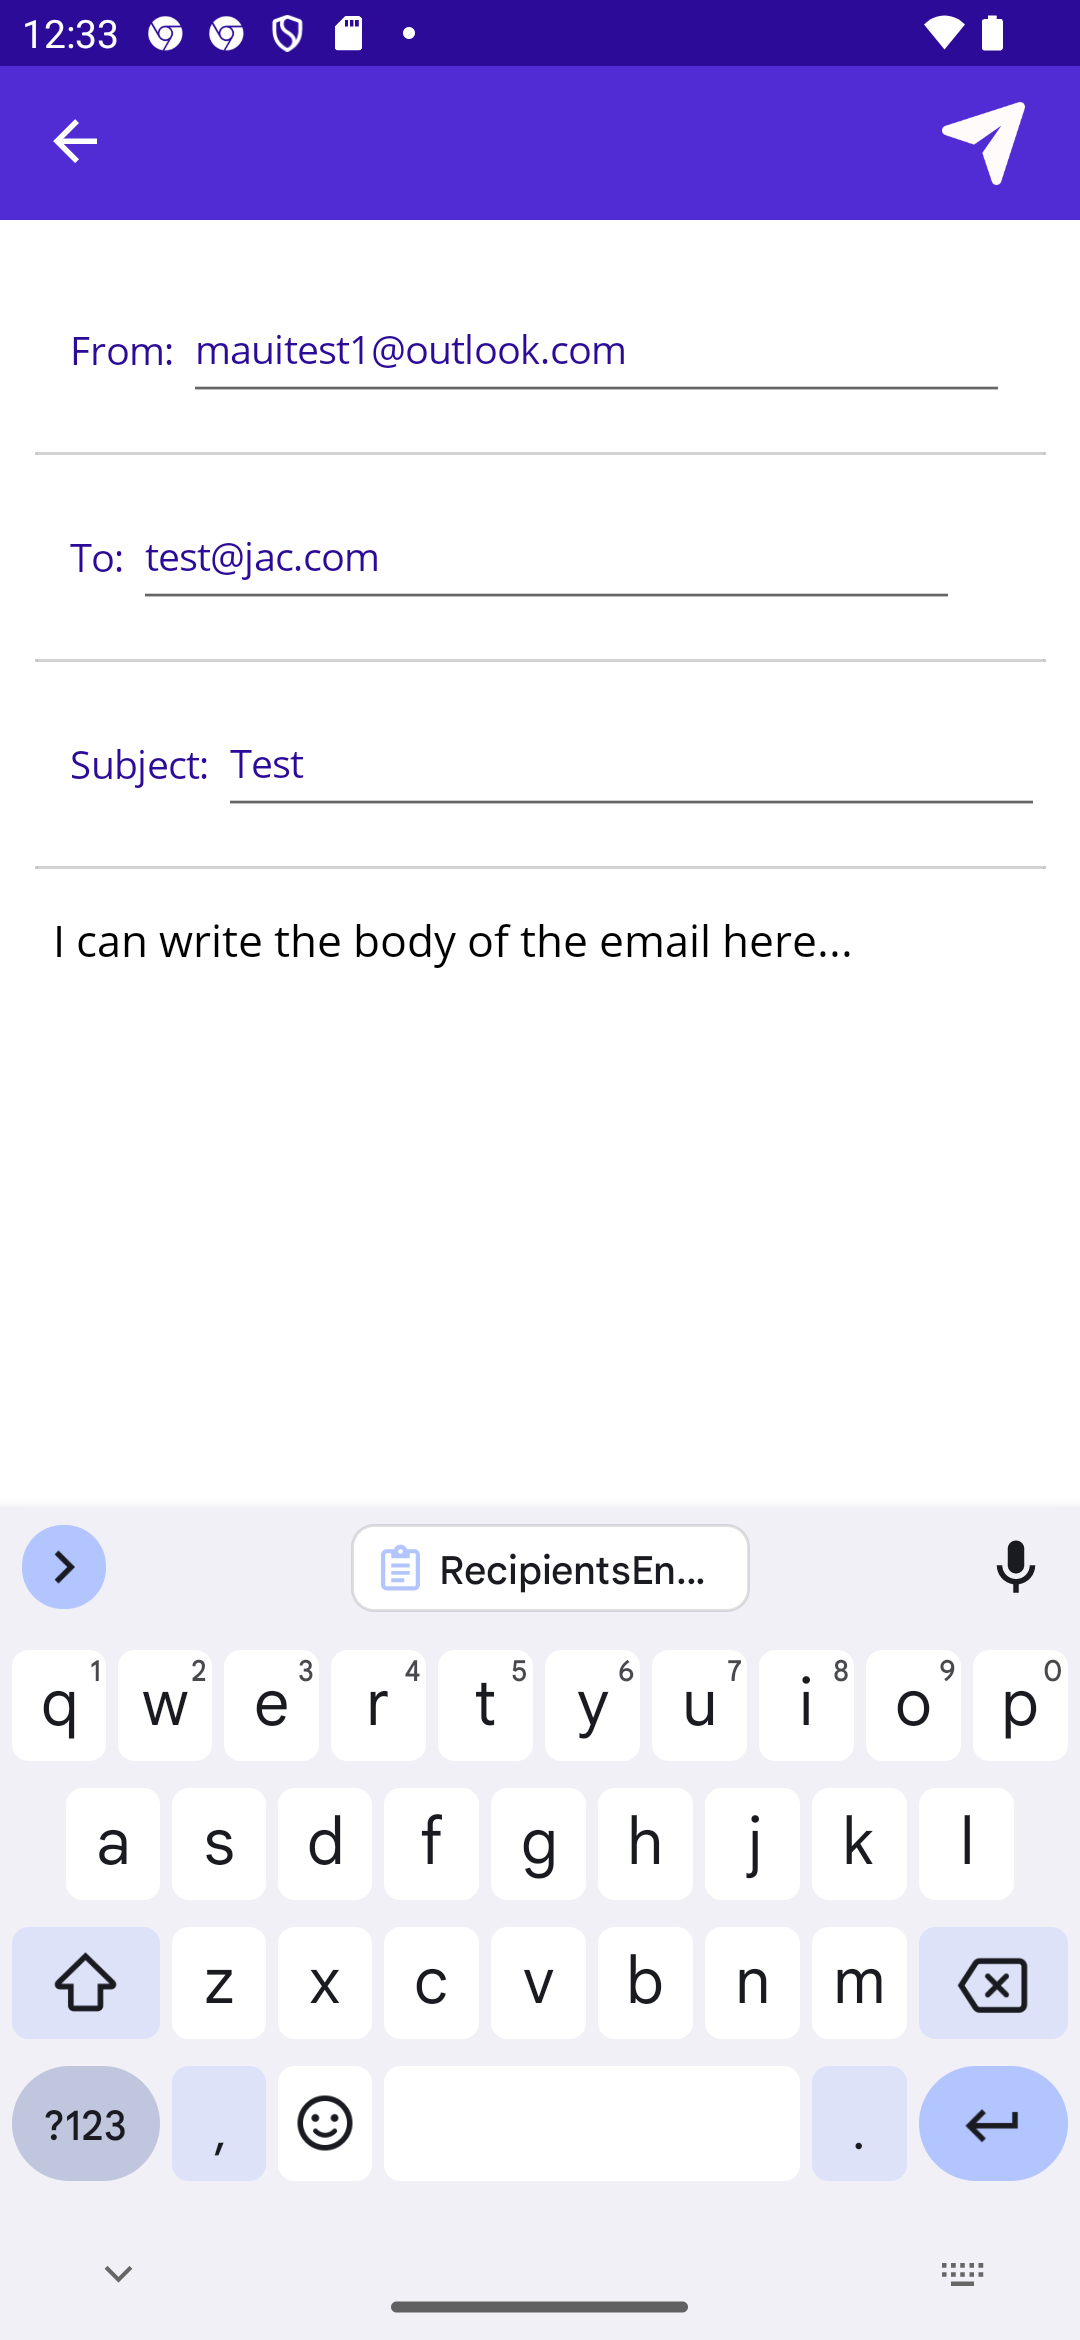
WritePage
Code behind:
-
The constructor of the
WritePagemight optionally receive an email as input, if the email was forwarded.Hint: Create a default value for the passed argument and use conditional logic in the constructor.
-
Initialize a public readonly property
EmailAddressnamedCurrentAddress. Set its value to a mock email for now.Note: we will later replace this with a real email provided by a mail service.
-
Initialize a public
Emailproperty to bind the various entries namedEditEmail. Set theSenderEmailto the email you defined previously. -
The
EditEmailcan be used as a Binding context for the various entries.XAML:
-
Contains an entry bound to the
CurrentEmail-
Should be
ReadOnly -
Bind it to the
SenderEmail -
Contains a entry for the recipients emails:
- The
Keyboardshould be set toEmail - Assume the inputted emails are separated by
"';'" - Use the
Completedevent to parse the emails entered by the user
- The
-
-
Contains an entry for the Subject
-
Contains an
Editor: -
Set the
HeightRequestto at least 500:Figure 5:
WritePagetemplate (left - forwarded email , right - new email)
Additional notes
- I suggest you draw a quick wireframe of your app to help you define the views and their interactions with the model
- For all image button icons, download them from flaticon or icon8
- Create your layouts with hard coded data for simplification
- Keep your code behind clean! (As little logic as possible)
Grading Rubric
| Evaluation Criteria | Details | Worth (/110) |
|---|---|---|
| UI Design | All requested elements available. 5 Use of at least a Tab Bar or a Flyout menu 2 Use of at least 1 CollectionView 2Use of application resources for UI styling 1 Use of converters 5 . Use of swipe view 3 . Use of tap gesture recognizer 2. |
20 |
| Views code behind | Correct use of dependency injection 5. Use of data binding 15. Proper string formatting when required 5. Use of the Data Repo to interact with the data 10. |
35 |
| Model Classes | Proper class design and use of OOP pillars.Email class 15EmailRepo class 20 |
35 |
| User stories | User stories are written from the perspective of the end user. User stories are simple and concise. Every user story has a clear acceptance criteria. | 5 |
| Functionality | App does everything and works as expected. App does not crash.. A user can view a list of email, send an email, delete and archive an email, mark as favorite… |
10 |
| Coding Style | Use of comments. Use of naming conventions. Avoid the use of magic numbers: define constants when needed. |
3 |
| Name & ID | At the top of all submitted files: provide your name, student ID and assignment number. | 2 |