Lecture 5 : Navigation
Demo made in class: Navigation
- One of the very first steps in designing an app is planning how to navigation in and out of the various pages.
- You’re first project milestone will be creating a mockup of the app including how the user should navigation across pages.
- So far we’ve used
Navigation.Pushasync()to push new pages on the stack - There exists four ways of navigating through pages:
- Tab bar navigation
- Flyout menu navigation
- Stack Navigation (what we’ve been using so far)
- Route Navigation
Stack Navigation
-
In Lab0, we used
await Navigation.PushAsync(new Page());to push a new page on the stack and this page becomes the active page. -
This type of navigation is called “Stack Navigation” or modal navigation
-
Other methods exist under the same
INavigationinterface:PushModalAsync(task in the active page must be completed similar to a pop-up)PopAsyncPopModalAsyncRemovePage(doesn’t work on Android)PopToRootAsync
-
This way of navigation is easy
-
Passing in data to the pushed page is very easy:
-
Through the constructor
await Navigation.PushAsync(new Page(int data,...)); -
Through the Binding context
var mypage = new Page();
mypage.BindingContext = someObject;
await Navigation.PushAsync(mypage);
-
-
It’s especially useful when the app has a specific flow:
- Sequential tasks:
- you must complete one task before moving to the next.
- Display Hierarchical data:
- you want to show more details.
- you are expanding the data on the page.
- Sequential tasks:
-
In order to remove the current page, we would use
Navigation.PopAsync();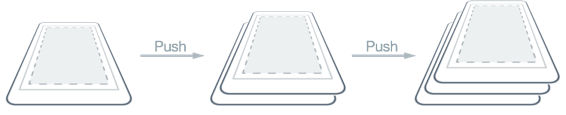

Shell
-
It’s a
XAMLPage that “provides the fundamental UI features that most app require” -
The app shell provides a different interface for navigation
-
The shell provides a
skeletonof your app, this is where you can define the hierarchy of the views -
You can define a
FlyoutMenuand/or aTabBar -
You can include all your pages and specify routes for those pages
-
You can define the look and feel of the
NavBar -
But! It’s more complex than Stack Navigation.
Flyout Navigation
If you wish to access the views used in this demo clone the Demos repos
-
The Flyout is sometimes called “hamburger” menu and is often represented with this icon:
-
When clicking on the icon a side bar appears with clickable items allowing the user to navigate to other pages in the app
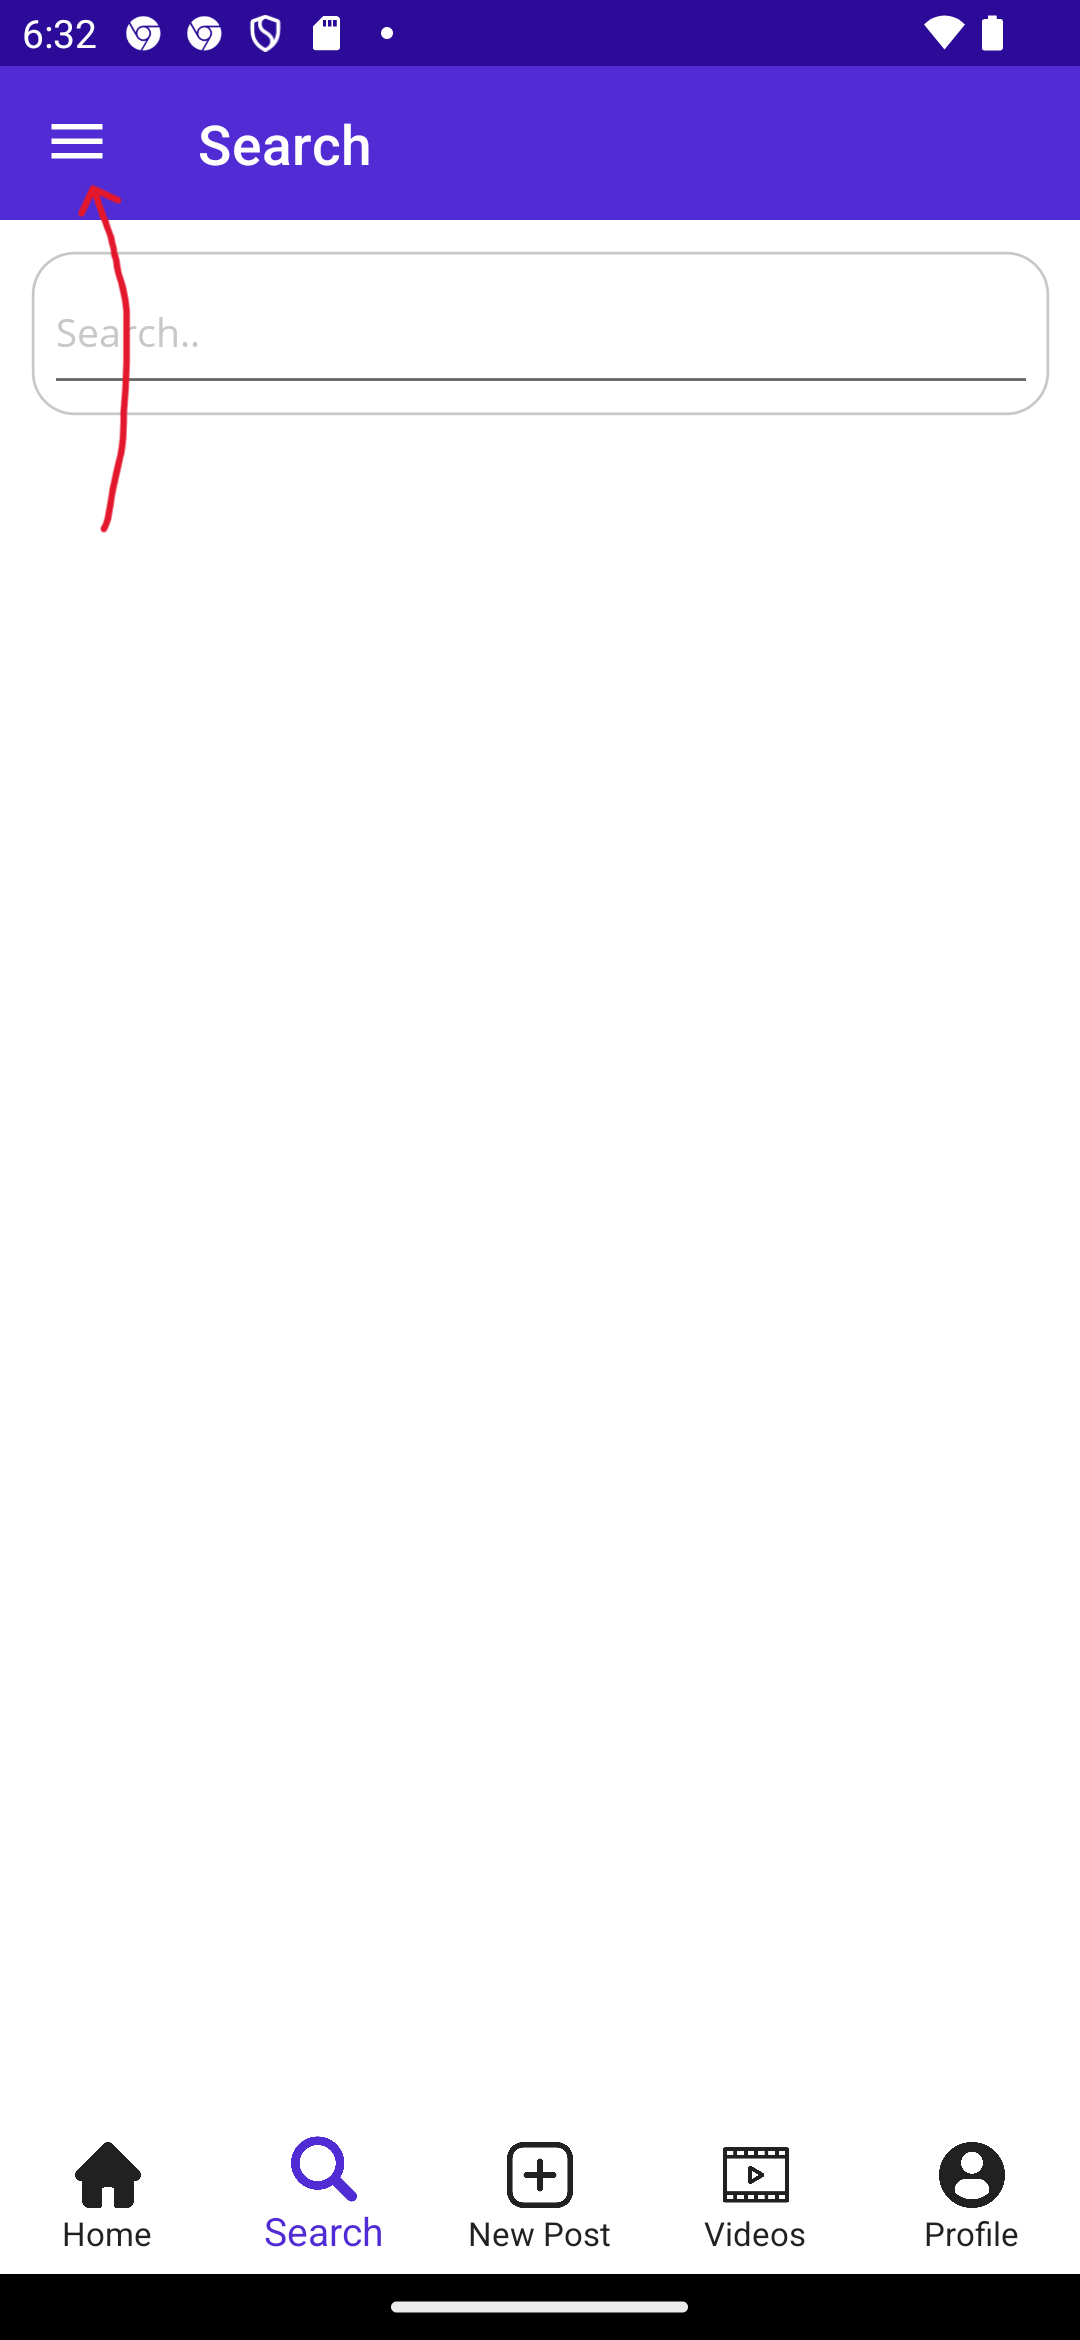
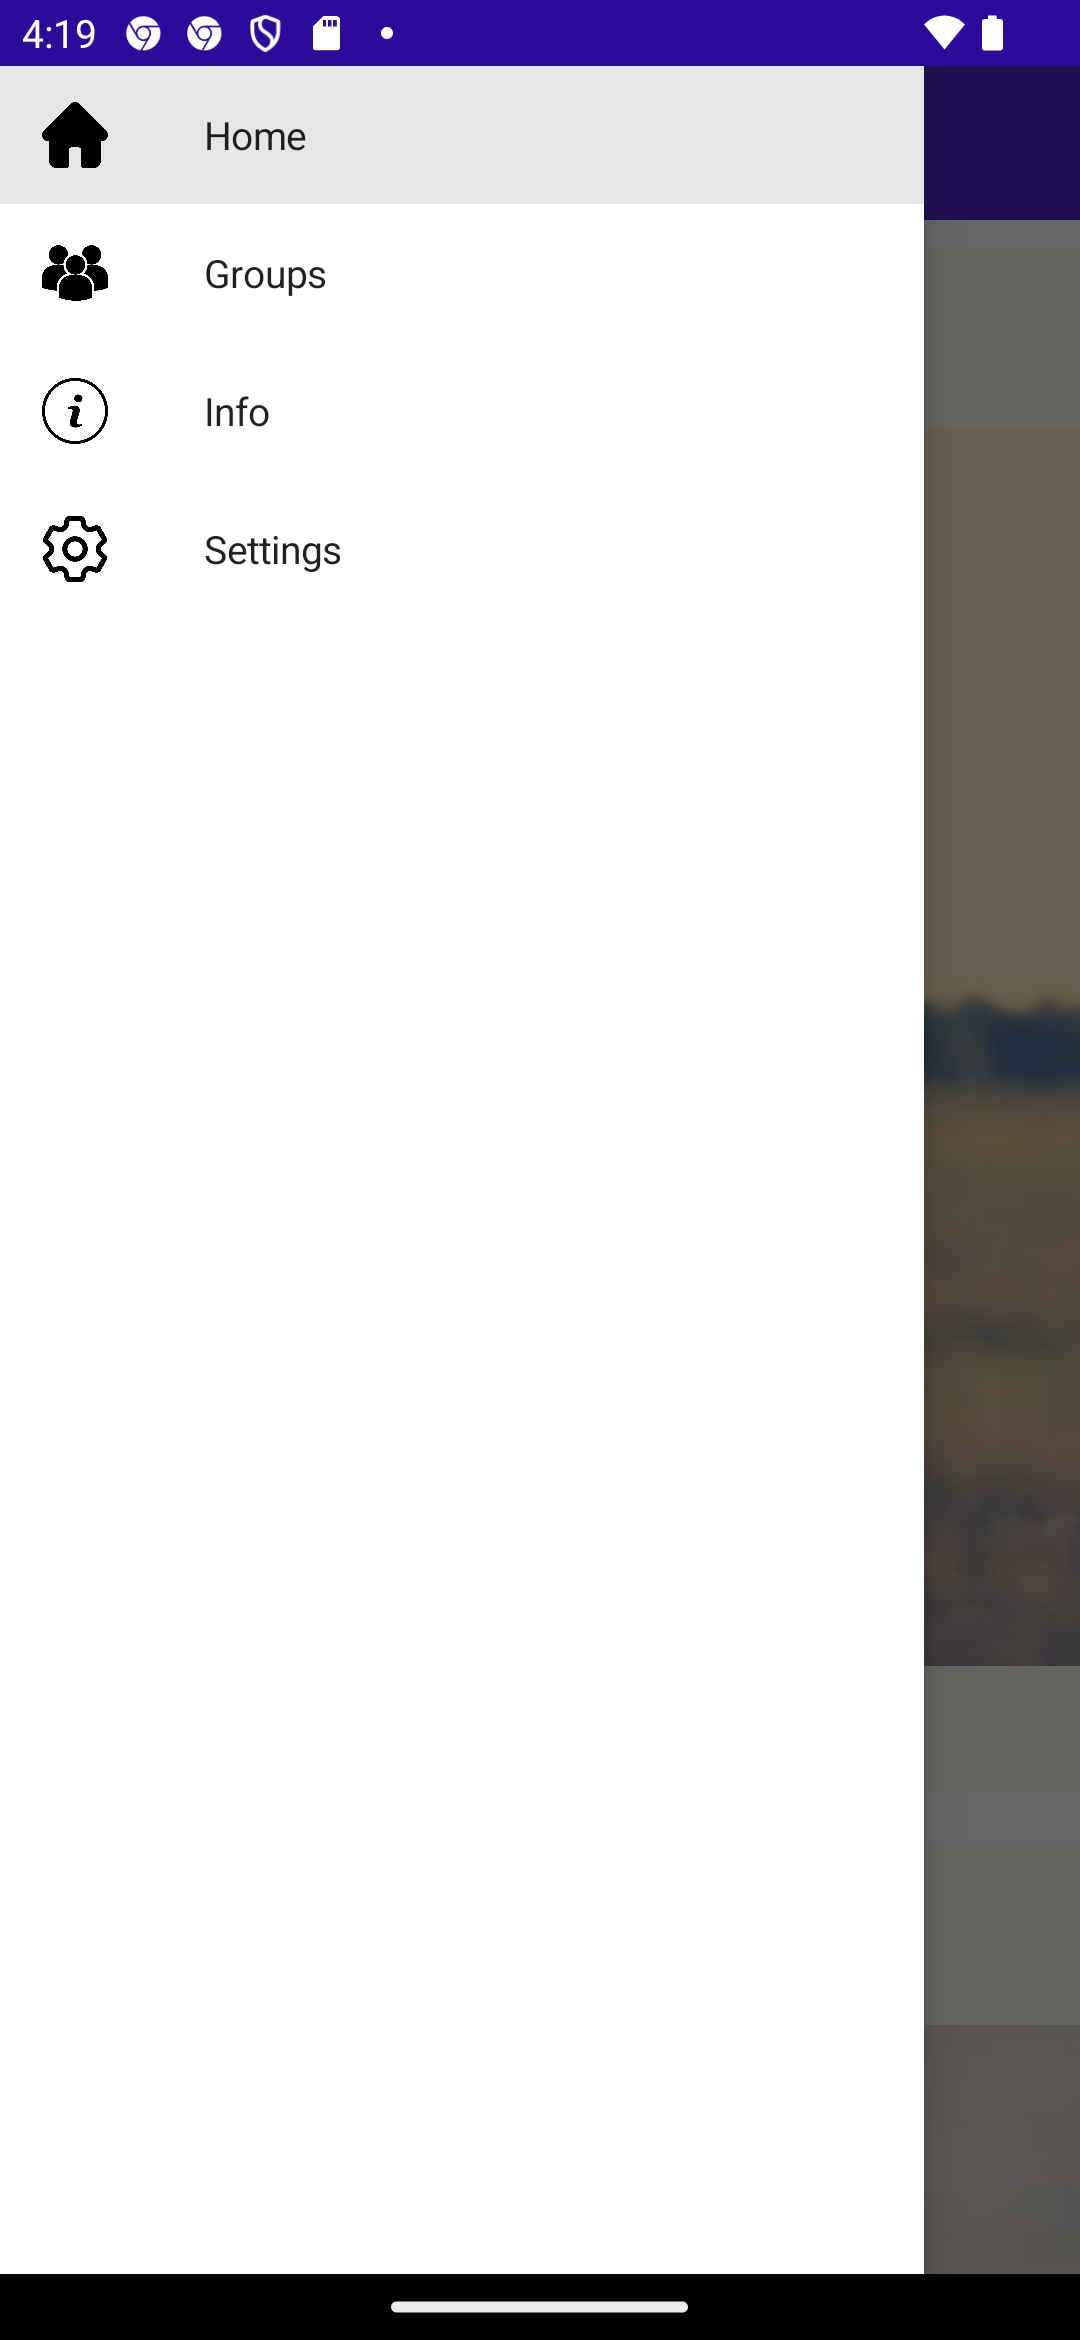
Creating a simple FlyoutMenu
- To create a flyout menu within your .NET MAUI app, open to the
AppShell.xamlfile: - The default MAUI project only contains a
ShellContentrouting to the main page:
<Shell
    x:Class="DemoNavigation2.AppShell"
    xmlns="http://schemas.microsoft.com/dotnet/2021/maui"
    xmlns:x="http://schemas.microsoft.com/winfx/2009/xaml"
    xmlns:local="clr-namespace:DemoNavigation"
    Shell.FlyoutBehavior="Disabled">

<ShellContent
    Title="Home"
    ContentTemplate="{DataTemplate local:MainPage}"
    Route="MainPage" />

</Shell>
-
Remove the line
Shell.FlyoutBehavior="Disabled"to enable the flyout behavior -
You can now add more
ShellContentand you’ll notice that I flyout menu appears on the top left corner containing a route to theMainPagetwice:
<Shell
    x:Class="DemoNavigation2.AppShell"
    xmlns="http://schemas.microsoft.com/dotnet/2021/maui"
    xmlns:x="http://schemas.microsoft.com/winfx/2009/xaml"
    xmlns:local="clr-namespace:DemoNavigation">

<ShellContent
    Title="Home"
    ContentTemplate="{DataTemplate local:MainPage}"
    Route="MainPage" />
<ShellContent
    Title="Home"
    ContentTemplate="{DataTemplate local:MainPage}"
    Route="MainPage" />

</Shell>
- To be able to refer to the views inside the
./Viewsfolder, add thexmlns:viewsnamespace toAppShell:
<Shell
    x:Class="DemoNavigation2.AppShell"
    xmlns="http://schemas.microsoft.com/dotnet/2021/maui"
    xmlns:x="http://schemas.microsoft.com/winfx/2009/xaml"
    xmlns:local="clr-namespace:DemoNavigation"
    xmlns:views="clr-namespace:DemoNavigation.Views">
- You can now include views inside this folder, and make use of the
Iconproperty to give the flyout menu a nicer look
<ShellContent
    Title="Home"
     Icon="home.png"
    ContentTemplate="{DataTemplate local:MainPage}"
    Route="MainPage" />
<ShellContent
    Title="Info"
    Icon ="setting.png"
    ContentTemplate="{DataTemplate views:InfoPage}"/>
Add two more pages to get this result:
- You should now be able to navigate to each one of these pages as you click on their icons:
UsingFlyoutMenuItem
- Flyout Menu items are simply buttons added to the flyout menu to make certain functionality available everywhere throughout the app
- For example, I added a menu button to toggle between light mode and dark mode:
<MenuFlyoutItem Text="Switch Theme" Clicked="Btn_SwitchTheme_Clicked"/>
- In the
AppShell.xaml.cscode behind I defined the event handler:
private void Btn_SwitchTheme_Clicked(object sender, EventArgs e)
{

    switch (App.Current.UserAppTheme)
    {
        default:
        case AppTheme.Light:
            App.Current.UserAppTheme = AppTheme.Dark;
            break;
        case AppTheme.Dark:
            App.Current.UserAppTheme = AppTheme.Light;
            break;

    }
}
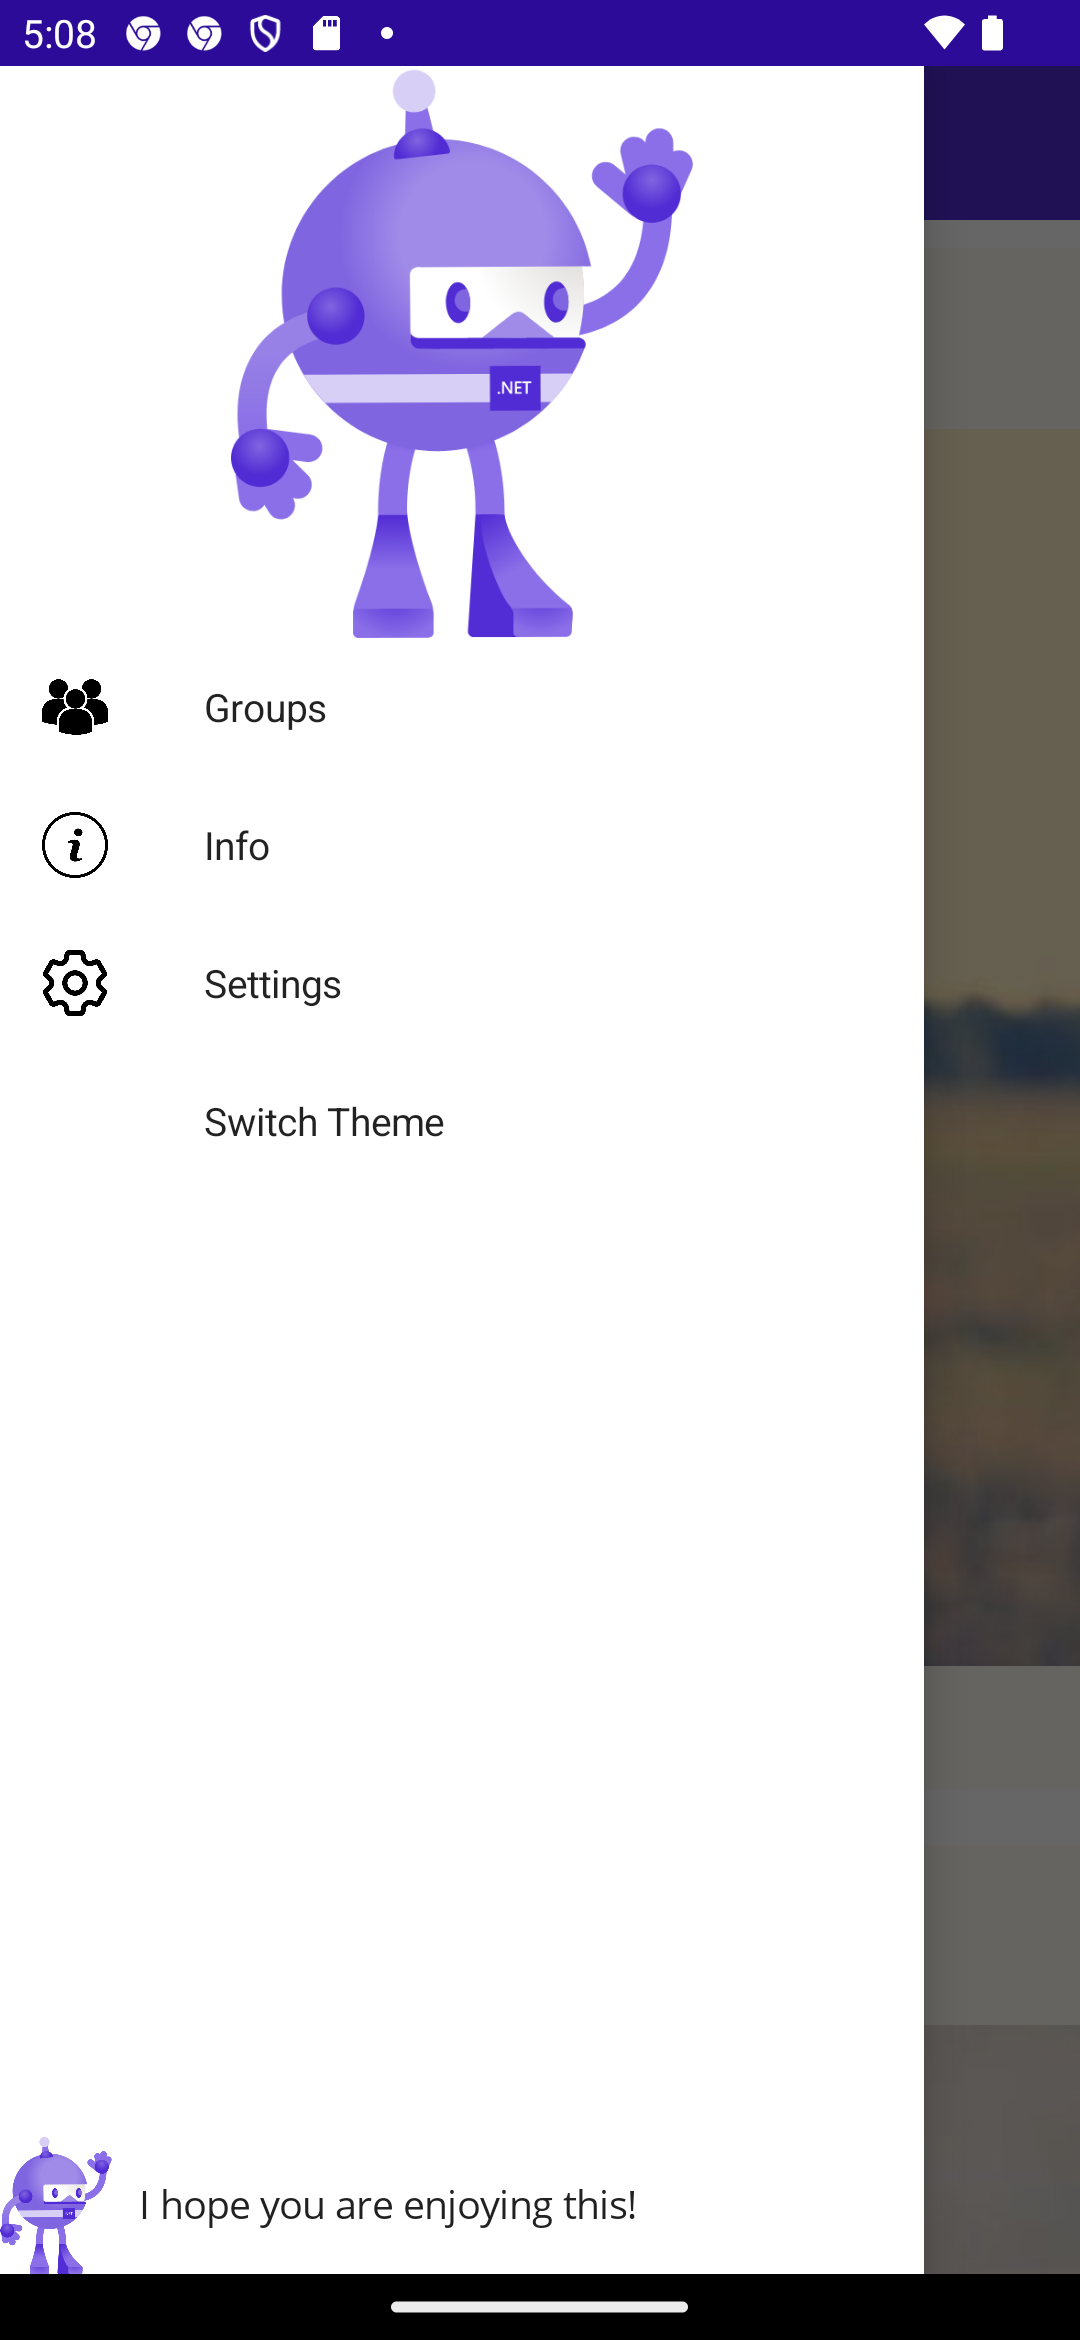
Customizing the FlyoutMenu:
- You can customize the
HeaderandFooterof your MAUI app to your liking

- Let’s try to add the
dotnet_bot.pngas the header and a horizontal stack layout containing this image and a label saying “I hope you are enjoying this!”:
<Shell.FlyoutHeader>
    <!--Some code.. -->
</Shell.FlyoutHeader>
<Shell.FlyoutFooter>
    <!--Some code.. -->
</Shell.FlyoutFooter>
Challenge (Easy): Microsoft’s phases of the moon:
- Follow Microsoft .NET MAUI training module: https://learn.microsoft.com/en-us/training/modules/create-multi-page-apps/3-exercise-implement-flyout-navigation to create a flyout menu for their Astronomy app.
Tab Bar navigation
The next navigation style we will learn about is Tab bar navigation:
- This is a permanent horizontal bar that appears generally on the bottom of the screen and holds various icons to navigate to some pages of the app.
- Warning! You might not necessarily need at Tab Bar, they increase the complexity of your app layout.
Tab Bar Design Guidelines
-
Microsoft’s recommendations:
“Use tabs only for the pages that will be frequently used by the user”
“Use tabs only if your app has a few pages of equal importance”
“Use 3-4 tabs to avoid over crowded apps”
“Avoid using tab bars if your data is traversed from general to more specific”
-
Apple’s recommendations:
“Use tab bars to support navigation not provide actions”
“Aim for a few tabs with short titles”
“Keep tabs visible even when their content is unavailable”. Otherwise your app’s interface seems “unstable” (frustrates the user)
Creating a simpleTabBar
- To add a Tab bar simply use the
TabBarobject as a child of theShell.
Then include ShellContent pages as children of the TabBar.
<TabBar>
    <ShellContent
        Title="Home"
         Icon="home.png"
        ContentTemplate="{DataTemplate local:MainPage}"
        Route="MainPage" />
    <ShellContent
        Title="Search"
        Icon="search.png"
        ContentTemplate="{DataTemplate views:SearchPage}"/>

    <ShellContent
        Title="Videos"
        Icon="video.png"
        ContentTemplate="{DataTemplate views:VideosPage}"/>
    <ShellContent
        Title="Profile"
        Icon="user.png"
        ContentTemplate="{DataTemplate views:ProfilePage}"/>

</TabBar>
Implicit conversions
-
Note: MAUI actually wraps each
ShellContentin aTabobject. But due to implicit conversions, the hierarchy seems simplified. In this case:The real hierarchy is:
- Shell
- TabBar
- Tab
- ShellContent
- Tab
- TabBar
Adding sub pages
- Shell
-
You can add multiple
ShellContentpages under the sameTabto create “grandchildren” pages<TabBar> <ShellContent Title="Home" Icon="home.png" ContentTemplate="{DataTemplate local:MainPage}" Route="MainPage" /> <ShellContent Title="Search" Icon="search.png" ContentTemplate="{DataTemplate views:SearchPage}"/> <Tab Icon="more.png" Title="New Post"> <ShellContent Title="Select photos" Icon="select.png" ContentTemplate="{DataTemplate views:FilePage}"/> <ShellContent Title="Camera" Icon="camera.png" ContentTemplate="{DataTemplate views:NewPostPage}"/> </Tab> <ShellContent Title="Videos" Icon="video.png" ContentTemplate="{DataTemplate views:VideosPage}"/> <ShellContent Title="Profile" Icon="user.png" ContentTemplate="{DataTemplate views:ProfilePage}"/> </TabBar> -
This will result in having a hierarchical structure within your pages, in this case the
FilePageandNewPostPageare grandchildren of theTabBar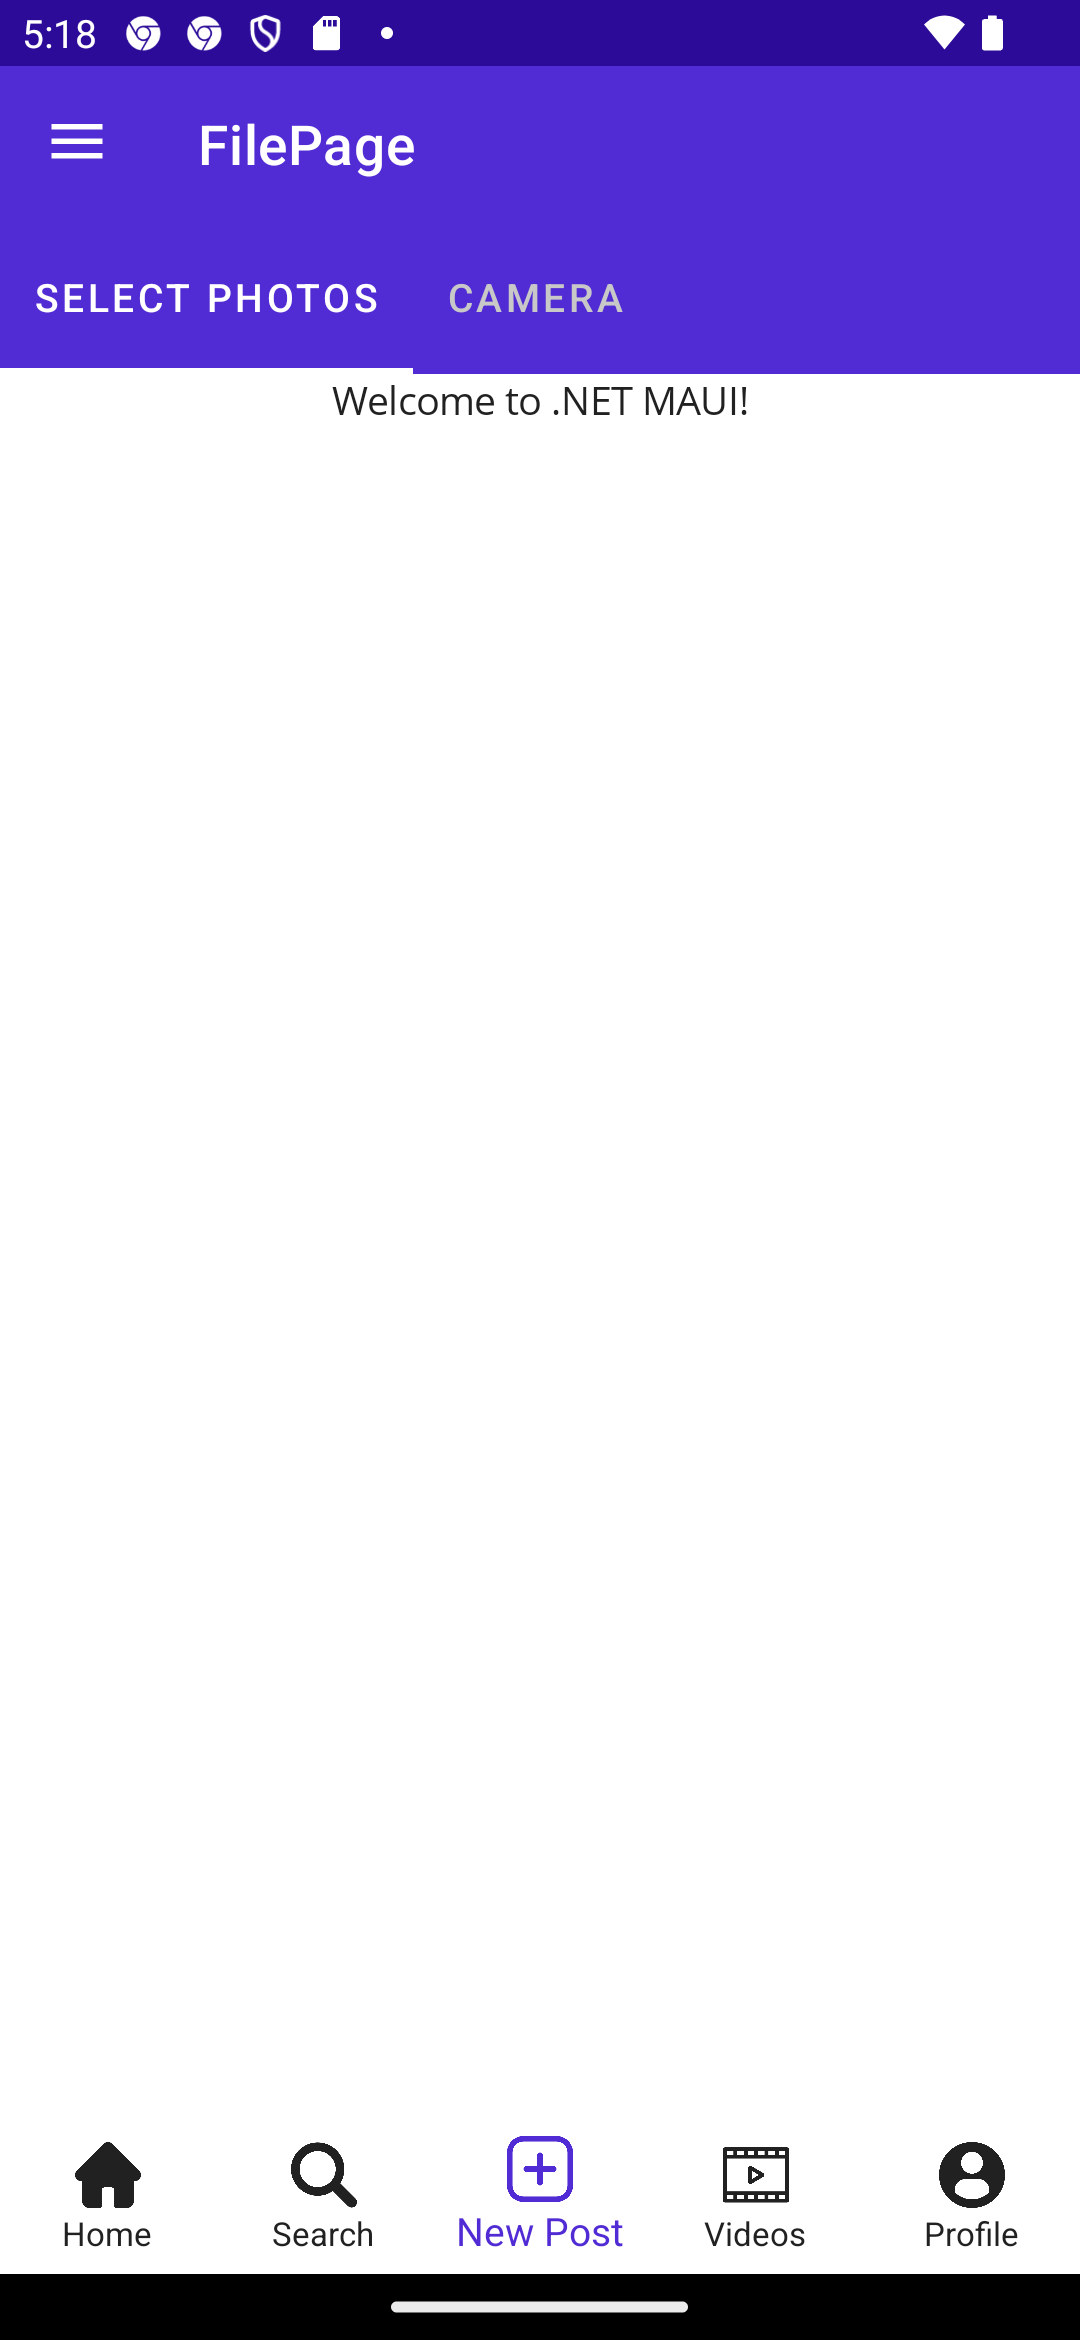
After this step, this is the current hierarchy
Shell
TabBarMainPageSearchPageTabFilePageNewPostPage
VideosPageProfile
Note: I am omitting the Tabs added by the implicit conversions
Combining TabBar and FlyoutMenu
-
The
Shellcan only contain either aFlyoutItemobject or aTabBarobject.- If you wish to combine both you must make the
TabBara child of theFlyoutItem
- If you wish to combine both you must make the
-
To combine the flyout menu and the tab bar, each
ShellContentyou wish to display in theFlyoutshould be wrapped within aFlyoutIteminstead of theTabBarand keep theShellContentyou wish to keep in the Flyout as direct children of theShell
<FlyoutItem Title="Home" Icon="home.png">
    <ShellContent
        Title="Home"
         Icon="home.png"
        ContentTemplate="{DataTemplate local:MainPage}"
        Route="MainPage" />
    <ShellContent
        Title="Search"
        Icon="search.png"
        ContentTemplate="{DataTemplate views:SearchPage}"/>
    <Tab Icon="more.png" Title="New Post">
        <ShellContent
            Title="Select photos"
            Icon="select.png"
            ContentTemplate="{DataTemplate views:FilePage}"/>
        <ShellContent
            Title="Camera"
            Icon="camera.png"
            ContentTemplate="{DataTemplate views:NewPostPage}"/>
    </Tab>

    <ShellContent
        Title="Videos"
        Icon="video.png"
        ContentTemplate="{DataTemplate views:VideosPage}"/>
    <ShellContent
        Title="Profile"
        Icon="user.png"
        ContentTemplate="{DataTemplate views:ProfilePage}"/>

</FlyoutItem>


<ShellContent Title="Groups"
          Icon="group.png"
          ContentTemplate="{DataTemplate views:GroupsPage}"/>
<ShellContent Title="Info"
          Icon="info.png"
          ContentTemplate="{DataTemplate views:InfoPage}"/>
<ShellContent Title="Settings"
          Icon="setting.png"
          ContentTemplate="{DataTemplate views:Settings}"/>

<MenuFlyoutItem Text="Switch Theme"  Clicked="Btn_SwitchTheme_Clicked"/>
- This might be counter intuitive at first, but with XAML’s implicit binding the children
ShellContentare wrapped inTabs then in aTabBar
The hierarchy is now:
Shell
-
Flyout-
TabBar-
MainPage SearchPageTabFilePageNewPostPage
-
VideosPage Profile
-
GroupsPageInfoPageSettings
-
Note: I am omitting the Tabs and the FlyoutItems implicitly added by the Shell
Challenge (Easy): Microsoft’s Sunrise Page:
- Follow Microsoft .NET MAUI training module: https://learn.microsoft.com/en-us/training/modules/create-multi-page-apps/5-exercise-implement-tab-navigation
Shell Navigation
So far we’ve seen how to access pages from the TabBar and the FlyoutItem, we have also seen how to Push a page into the stack and use the Back button to return to the previous page.
Shell navigation will enable us to navigate to any page using Uri links called routes. This type of navigation is especially useful if you wish to navigate to a particular page without having to visit the entire hierarchy of pages and return to the previous page without having to visit backwards all the pages on the navigation stack.
Routes
- Routes are Uris similar to a website’s uri
- They allow us to navigate through the hierarchy of the app.
- If you inspect the
ShellContentof theMainPage, there is a setRouteattribute.
<ShellContent
    Title="Home"
    ContentTemplate="{DataTemplate local:MainPage}"
    Route="MainPage"/>
- If the
MainPagewas at the Root of the app, you could navigate to this page using:
await Shell.Current.GoToAsync("//MainPage");
- UPDATE: Add the various routes of the pages,…
    <FlyoutItem Route="Home" Title="Home" Icon="home.png">
        <ShellContent
            Route="MainPage"
            ContentTemplate="{DataTemplate local:MainPage}"/>

        <ShellContent
            Route="SearchPage"
            ContentTemplate="{DataTemplate views:SearchPage}"/>
		<!--Some code...-->
        <Tab Icon="more.png" Title="New Post" Route="AddPost">
            <ShellContent
                Route="FilePage"
                ContentTemplate="{DataTemplate views:FilePage}"/>
            <!--Some code...-->
            <ShellContent
                Title="Camera"
                Icon="camera.png"
                Route="NewPostPage"
                ContentTemplate="{DataTemplate views:NewPostPage}"/>
        </Tab>

        <ShellContent
            Route="VideosPage"
            ContentTemplate="{DataTemplate views:VideosPage}"/>
        <ShellContent
            Route="ProfilePage"
            ContentTemplate="{DataTemplate views:ProfilePage}"/>

    </FlyoutItem>

    <ShellContent
              Route="GroupsPage"
              ContentTemplate="{DataTemplate views:GroupsPage}"/>
    <ShellContent
              Route="InfoPage"
              ContentTemplate="{DataTemplate views:InfoPage}"/>

    <ShellContent
              Route="SettingsPage"
              ContentTemplate="{DataTemplate views:SettingsPage}"/>
Explicit routes Registration in C#
-
Routes can get messy in complex hierarchies, just like for websites
-
We want to avoid as much as possible magic strings in our app, to solve this:
-
Use the name of the page as its route
-
Use the
nameof()method to register the route in the code behind
In
AppShell.xaml.cs:public AppShell() { InitializeComponent(); Routing.RegisterRoute(nameof(CommentsPage), typeof(CommentsPage)) // UPDATE: Add other pages that are not part of the Flyout or TabBar... } -
-
Note: You may define hierarchical routes too at this point using forward slashes in the routes arguments,
Routing.RegisterRoute($"//Home/{nameof(MainPage)}", typeof(MainPage));
Performing Navigation using Shell.Current.GoToAsync()
-
Let’s add a
New Postbutton inside theGroupsPage -
Since the
NewPostPageis part of theTabBar, you should use the absolute route to navigate to it (using “//”). Why? What happens if we don’t use “//”private async void Btn_AddPost_Clicked(object sender, EventArgs e) { await Shell.Current.GoToAsync($"//Home/AddPost"); }
Challenge (Easy):
-
I have disabled the Tab Bar inside the the
NewPagePage:<ContentPage xmlns="http://schemas.microsoft.com/dotnet/2021/maui" xmlns:x="http://schemas.microsoft.com/winfx/2009/xaml" x:Class="DemoNavigation2.Views.NewPostPage" BackgroundColor="Black" Shell.TabBarIsVisible="False" Title="New Post"> </ContentPage> - Include an “x” button to cancel the operation of taking a picture and use the event handler of this button to navigate to the main page
- In the event handler, navigate to the main page using absolute routing (“//”) and using the
nameof()method - Refer to Microsoft’s documentation for the various route formats.
Challenge question (Medium):
What’s the point of using routing to go to the MainPage? Why not simply PushAsync the MainPage?
Challenge (Medium): Navigating to CommentsPage:
-
You’ll notice that the
CommentPageis not in the Tab Bar hierarchy -
Previously (Lab1) we were simply using
PushAsyncto push a newCommentsPageeverytime. -
Let’s try to reuse the same page and simply navigate to it using
GoToAsync -
Modify the event handlers in the
MainPageand theVideosPageto navigate to thisCommentPage- Without passing arguments (only passing the route as argument to
GoToAsync()) - With arguments: provide a
UserId,ProfilePicandComments.
Hint: Use a dictionary<string,object> and QueryProperty
- Without passing arguments (only passing the route as argument to
Challenge (Easy): Using Backward navigation
- You’ll notice that I disabled the
NavBarand theTabBarin theCommentPage - Modify the event handler inside the
CommentsPageto return to the previous back (regardless of which page it is) - Refer to Microsoft’s documentation for the various route formats.
Passing Arguments to page constructor using GoToAsync
Passing simple data types as strings or int can be done using string formatting
await Shell.Current.GoToAsync($"{nameof(MyPage)}?SimpleArgument={12345}");
To pass multiple arguments and complex objects you need to use a dictionary Dictionary<string, object>:
await Shell.Current.GoToAsync(nameof(MyPage), new Dictionary<string, object> {
    {"Arg1", value1},
    {"Arg2", value2},
    {"Arg3", value3}
});
The page receiving this data must have QueryProperty and associated public properties:
[QueryProperty(nameof(Property1), "Arg1")]
[QueryProperty(nameof(Property2), "Arg2")]
[QueryProperty(nameof(Property3), "Arg3")]

public partial class MyPage : ContentPage
{

    public int Property1 { get; set; }
    public string Property2 { get; set; }
	public List<int> Property3 {get; set;}

    /// Some code...
}