Lecture 4: Data binding
Demo made in class: Basic Binding
-
In C#, data bindings allow properties of two objects to be coupled, i.e: to change together.
-
A change in one object causes a change in the other.
-
One is called the source and the other is the target.
-
Data Binding involves a binding object which transfers the data from source to target and/or vice versa.
-
The target property must be a
bindableproperty: which means that the target object must derive fromBindableObject. -
The online
.NET MAUIdocumentation indicates which properties are bindable properties.Example: A property of
Labelsuch asTextis associated with the bindable propertyTextProperty(source).
-
-
.NET MAUIprovides a markup extension to provide binding throughxaml.- There are multiple ways to set the
BindingContextof the target object. Sometimes it’s set from the code-behind file, sometimes using aStaticResourceorx:Staticmarkup extension, and sometimes as the content ofBindingContextproperty-element tags.
- There are multiple ways to set the
 |
|---|
| Data Binding |
XAML Markup extensions
This feature of XAML is useful to add functionality to the XAML page. For example using data binding or using colors defined in a static dictionary. All Markup expression implement the IMarkupExtension interface so that they can be referenced by XAML. Think of them as pointers to new functionality.
Markup Extensions appear as curly brackets in XAML, here are a few examples:
-
You can use a string to define a color instead of having to set the
Colorattributeexample:
<Boder BackgroundColor="Red"/> -
You can use a static dictionary:
example:
"BackgroundColor = {StaticResource Secondary}" -
You can use a data type using:
example:
{x:Type myDataType} -
The following are the most comment markup expressions:
-
AppThemeBinding: refers to the current system theme -
Binding: The topic of this lecture! -
DataTemplate: A template object for multi-binding (see: Example below) -
DynamicResource: A link to a dictionary key for styling values that may change at run time (for example in a game) -
StaticResource: A link to a static dictionary with values that are static (ex: Theme colors) -
OnPlatform: This helps you customize the UI based on the platform. -
x:Static: referencing static fields, property or enums. -
x:Reference: referencing a named item on the same page (for whichx:Namewas set) -
x:Array: declares an array of a given data type :<x:Array Type ="{x:Type x:Int16}"> <x:Int16>1</x:Int16> <x:Int16>2</x:Int16> <x:Int16>3</x:Int16> <x:Int16>4</x:Int16> </x:Array> -
x:Type: refers to a data type object inSystem.Type(note you must include theSystem.Typenamespace to find the usual data types) -
x:Null: null value for XAML properties.
-
Visual element to Visual element
Bindable attributes of a visual element can be bound to other attributes from the same Content Page. Bindings can be set on any class that derives from BindableObject
How does it work?
- Use of the Markup extension
{Binding ...} - You may either use the
BindingContextto set the source - You may alternatively specify the
Sourcedirectly in the Target and use thePathto bind to a particular property. - Refer to the following example:
<Slider x:Name="slider"
        Maximum="360"
        VerticalOptions="Center" />
<Label Text="{Binding Source={x:Reference slider}, Path=Value}"/>
Refer to the documentation from more information.
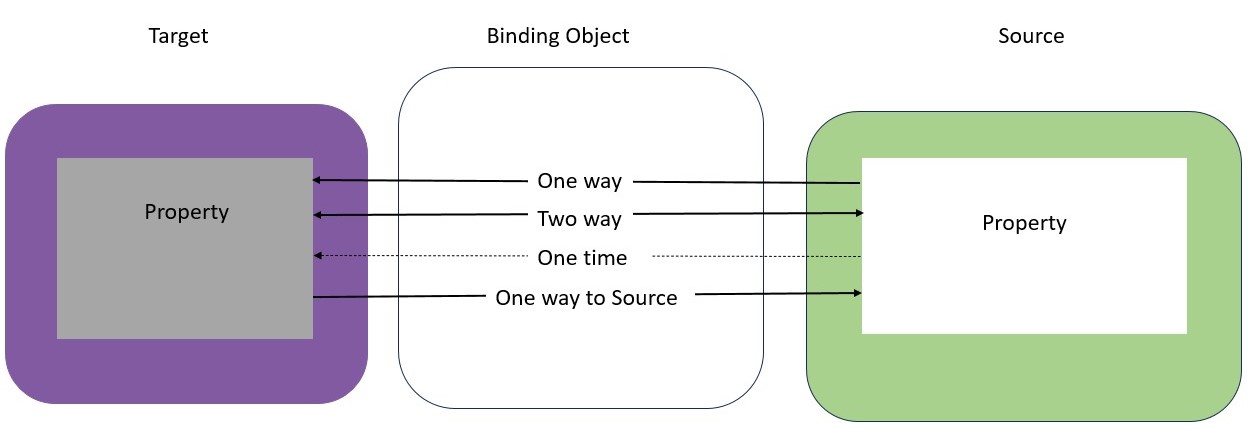
Binding Modes
-
A single view (page) can have data bindings on several of its properties. However, each view can have only one
BindingContext, so multiple data bindings on that view must all reference properties of the same object. -
Each property has a different relation with the UI element it is bound to. The
Modeproperty of
Binding, which is set to a member of theBindingModeenumeration and can have one of the following values:Default- depends on the UI item being bound, usuallyTwoWayOneWayvalues are transferred from the source to the target.OneWayToSourcevalues are transferred from the target to the source.TwoWayvalues are transferred both ways between source and target.OneTimedata goes from source to target, but only when theBindingContextchanges.
String formatting
You may bind values to the Text property of a UI element such as a Label while keeping a specific format, for example: if you wish to represent a date as such: “Today: October 23, 2023”
<ContentPage xmlns="http://schemas.microsoft.com/dotnet/2021/maui"
             xmlns:x="http://schemas.microsoft.com/winfx/2009/xaml"
             xmlns:sys="clr-namespace:System;assembly=netstandard"
             x:Class="DataBindingDemos.StringFormattingPage"
             Title="String Formatting">
    <VerticalStackLayout BindingContext="{x:Static sys:DateTime.Now}">
        <Label Text="{Binding StringFormat='Today: {0:MMMM dd, yyyy}'}" />
    </VerticalStackLayout>
</ContentPage>
Here are a few useful string formattings:
{0:F2}: Two digits after the decimal{0:F0}: Only the integer part{0:MMMM}: Month, January, February, …": double quotations- ``: to display curly brackets
For more complex translations of the bound values, use Converters.
Visual element to C# Property
To create a binding between the XAML and the code behind of a Page, you simply need to specify the BindingContext inside the constructor of the ContentPage.
Let’s use the example of the PostPage from Lab1. In this page we have hardcoded the image path within the XAMLcode to create the layout of a post.
We could create a public property in the code behind to bind the image source:
PostPage.xaml.cs:
namespace Lab1.Views
{
    public ImageSource PostImg { get; set; } = ImageSource.FromFile("fall.jpg"); //Added
    public partial class PostPage : ContentPage
    {
            public PostPage()
            {
                InitializeComponent();
                BindingContext = this; // Added
            }
    }
}
PostPage.xaml:
    <ScrollView>
        <VerticalStackLayout Padding="10" Spacing="5" VerticalOptions="Center">
            <!-- content...-->
            <Border BackgroundColor="Black" Padding="5">
                <Image Source="{Binding PostImg}"  Aspect="AspectFit" MaximumHeightRequest="500"/>
            </Border>
            <!-- content...-->

        </VerticalStackLayout>
    </ScrollView>
Question: Why did I use an ImageSource and not a string? Test it out with the dotnet_bot_jetpack image on the same page and explain why isn’t it working with strings?
Challenge #1; Use binding to properties to replace the hardcoded dotnet_bot_jetpack source image and the .NET Bot label.
**Challenge #2: **Try using binding by making the LikesCount a public property and bind it to XAML using String formatting.
You might wonder, what have we gained by using binding in those example?
Not much for now, but as we make the
PostPagemore dynamic, having access to the variable properties in the code behind will make our lives much easier later on.
Example of the CollectionView
Let’s make the comment list in the Lab1 more dynamic using binding.
Defining a CollectionView in the PostPage.
ItemSource
<CollectionView.ItemsSource>
    <x:Array Type ="{x:Type x:String}">
        <x:String>Cool! Nice pic</x:String>
        <x:String>amazing!</x:String>
        <x:String>I love it</x:String>
        <x:String>Cool! The colors are so bright!</x:String>
    </x:Array>
</CollectionView.ItemsSource>
Alternatively, the data structure can be defined in the code behind as a public property:
public partial class CommentPage : ContentPage
{
    private List<string> _comments = new List<string>() { "Cool! Nice pic", "amazing!", "Trop beau!!", "I love it", "Cool! The colors are so bright!" };
    public List<string> Comments { get { return _comments; } }
    public CommentPage()
    {
        InitializeComponent();
        BindingContext = this;
    }
}
By setting the BindingContext = this, the XAML ContentPage can now access public properties of the associated code behind class. Note: You must remove the <CollectionView.ItemsSource> .... from the code behind to avoid setting it twice.
<CollectionView AbsoluteLayout.LayoutBounds="0.5,0.35,1,0.80" AbsoluteLayout.LayoutFlags="All" ItemsSource="{Binding Comments}">
We may eventually define a model class to include all the properties of a comment:
public class Comment
{
    public int UserId { get; set; }
    public Uri ProfilePic { get; set; }
    public string Text {  get; set; }
}
We can then use a List<Comment> in the CommentPage code behind as such:
public List<Comment> Comments { get; set; } = new List<Comment>()
{
    new Comment() {
        UserId = 123,
        Text = "Wow great pic!",
        ProfilePic = new Uri("https://www.innovus.co.za/images/getimage/?k=/assets/images/spin-out-companies/samplegallery/Sony-DSC-RX1-Sample-Image.jpg&w=250&h=250&d=1&crop=1")},
    new Comment() {
        UserId = 456,
        Text = "Nice!",
        ProfilePic = new Uri("https://www.innovus.co.za/assets/images/spin-out-companies/samplegallery/zz.jpg")},
    new Comment() {
        UserId = 789,
        Text = "Baahh I don't like your pic",
        ProfilePic = new Uri("https://www.innovus.co.za/assets/images/spin-out-companies/samplegallery/sample4_l.jpg")}
}
 <CollectionView ItemsSource="{Binding Comments}">
     <!--some code...-->
- I know this might feel heavy at first, but the data will typically be fetched from a database and not hard coded inside you code!
ItemTemplate
The item template define how each child item in the collection view should be displayed and how this
<CollectionView.ItemTemplate>
    <DataTemplate>
        <HorizontalStackLayout>
            <Image Source="{Binding ProfilePic}" WidthRequest="35"/>
            <Border BackgroundColor="LightGray" StrokeShape="RoundRectangle 10,10,10,10" Padding="5">
                <Label Text="{Binding Text}"/>
            </Border>
        </HorizontalStackLayout>
    </DataTemplate>
</CollectionView.ItemTemplate>
Adding Items to the Collection View:
Let’s try to add comments by reading the text input from the Entry when the send ImageButton is clicked.
-
In your code behind add private attributes representing the current user’s Id and User profile pic, this is the profile pic used for posting new comments:
private int userId_ = 456; private string userProfilePic_ = "<add a url to pic of your choice>"; -
Modify the
Entryin theCommentPageso that it has ax:Nameproperty:<Entry x:Name="CommentsEntry" Placeholder="Add a comment..." <!-- ...etc... ---> -
Add an event Handler on your
ImageButtonand rename it accordinglyprivate void Btn_Send_Clicked(object sender, EventArgs e) { string comment = CommentEntry.Text; if(comment !=null) { Comments.Add(new Comment(){UserId= userId_, Text=comment,ProfilePic = new Uri(userProfilePic_)}); CommentEntry.Text=""; } } -
What do you observe? Why is the comment not added?
Answer: The List is a data structure that does not notify its subscribers of any new added item. To solve this you can either:
call the
OnPropertyChangedevent or you can use anObservableCollection
What is an ObservableCollection?
As the list of comments is modified, we need to have a mechanism to notify the CollectionView that the data structure was changed, you may use an ObservableCollection<Comment> instead on List<Comment> which is a data collection that implements the INotifyPropertyChanged. We will see more on this in future lectures.
Challenge 1 (Easy): Adding Comments in the PostPage
Try to add a similar comments section in the PostPage.
Challenge 2 (Medium): Avoid overwriting the comments when the CommentPage is pushed.
How can we make the comments list shared across both pages and how can we make sure the comments added in the CommentPage won’t be lost once you navigate out and into the page.
Hint: There are two possible solutions: 1) create a static data repo that will make it accessible throughout the views (this is the easiest option for now), 2) dependency injection : pass the comment list by reference to the constructor of the
CommentPage
Challenge 3 (Hard): Creating a Post model
-
Create a
Postmodel which will save the following information:Poststring UserIdstringUsernameUri ProfileImageUri ContentImageObservableCollection<Comment> Commentsint Likes
-
Instantiate a
Postin your code behind with a list ofComments -
Set the
Comments = DataRepos.SocialMediaPosts[0].Comments -
Create a public property for the
ContentImage -
Set it to
DataRepos.SocialMediaPosts[0].ProfileImage. -
Bind the
ContentImageto the Image behind displayed. -
Bind the
Likesto theLikesLabelin the code behind.Hint: You might need to change the
Postclass to make it notify the UI of any change.
Challenge 4 (Medium): Swipe through posts
-
Add a
Data Reposfolder and add aPostsclass - Modify the
Postsclass to make it static - Add a static property
ObservableCollection<Post> SocialMediaPosts - Add posts and comments to every post.
Hint: You can use a
CarouselViewor simply add left/rightImageButton
INotifyPropertyChanged
As per Microsoft documentation, to notify the UI that a property has been updated dynamically, the following has to be applied to the model class:
-
The class must use public properties:
- A property requires a getter to provide a value to the UI element.
- A property requires a setter to send a value from the UI to the class.
-
The class with bound properties must implement
INotifyPropertyChangedinterface. -
Declare an event
public event PropertyChangedEventHandler PropertyChanged;. -
The property must be a full property with a private backing field and a full setter and getter.
-
Create the
OnPropertyChangedmethod to raise the event. (code provided in the documentation above or in this example):public class Post : INotifyPropertyChanged { // Create the OnPropertyChanged method to raise the event // The calling member's name will be used as the parameter. protected void OnPropertyChanged([CallerMemberName] string name = null) { PropertyChanged?.Invoke(this, new PropertyChangedEventArgs(name)); } } -
Finally,
OnPropertyChanged();should be called in the setter of the property that is required to update the UI, for example:public class Post : INotifyPropertyChanged { int likes_ = 0; public int Likes { get { return likes_; } set { likes_ = value; // Call OnPropertyChanged whenever the property is updated OnPropertyChanged(); } } ///Some more code... -
If a property affects other properties in the model, you can raise the event multiple times providing the properties that should be updated:
public class Post : INotifyPropertyChanged { ///Some more code... public string UserId { get { return userId_; } set { userId_ = value; // Call OnPropertyChanged whenever the property is updated OnPropertyChanged(nameof(ProfileImage)); OnPropertyChanged(nameof(Username)); } } ///Some more code... -
The UI elements should use
Bindingto connect to the properties of the class.<HorizontalStackLayout> <Image Source="{Binding ProfileImage}" HeightRequest="50"/> <Label Text="{Binding Username}" VerticalTextAlignment="Center" FontAttributes="Bold" FontSize="Medium"/> </HorizontalStackLayout> <Label x:Name="LikesLabel" Text="{Binding Likes , StringFormat='{0:N0} Likes'}"/> -
Each property that is required to change a UI value should follow the process.
Check this link for more details in
.NET MAUI.
This might feel tedious at first! We will see later that there exist Nuget Packages (System.ObjectModel and PropertyChanged.Fody) that can generate all this code for us.